


IFC (Industry Foundation Classes) – Part 06 – Layers and Classification in Autodesk Revit

INTRODUCTION
Welcome back everyone ☺
I hope you’ve all had fun testing the workflows in the previous blog posts. As I’ve explained IFC provides a good basic method of structuring information, we should think of this as the default way which should be used across every project and every information management activity.
In addition to this there will be other ways in which information needs to be ordered to enable further identification, better understanding, different uses, or even for certain software. This post is all about how we can add additional ways of allowing information to be ordered.
This topic is close to my heart as it’s one of the fundamental principles of information; being able to create lists of stuff helps us to organise it better which in turn makes it easier to find and to help us make sense of it. When modelling and analysing, it allows us to do clever things like set up rules to override graphics, control visibility and to allow us to create automated checks.
There are various ways in which information can be structured; classification systems, vocabularies, taxonomies and rules to name a few which are usually based around hierarchy. But they are still essentially flat lists where there is little connection between one value and another.
The reason IFC is different to these is because the schema contains RELATIONSHIPS and this is what makes IFC special and far more powerful than any of the above (in this respect it shares more similarities with an ontology, although not fully) and because of this it means it provides us with a good base when we start looking at linked sematic data and graph databases. This is one of the reasons I’ve invested so much time into it and why it is so much more than a dumb 3D model in which most people currently believe it to be.
The problem we have is that in construction our information is very complex, it’s big for a start, it’s multi-faceted (it can be broken down/packaged up in different ways) whilst at the same time it can be applied to one single item, a collection of items, a whole facility or even the project, but for me this just makes it even more fascinating!
Thinking of this in the world of Autodesk Revit there are two approaches we are going to look at in this blog post:
-
Layers – this takes specific metadata about an object (or thing) and orders it within a string (sequence of characters). The syntax of this is documented in BS EN ISO 13567-2:2017 (For UK users make sure you use the 2019 update, and read the UK National Foreword)
-
Classification – this populates metadata and is object based so it’s applied to objects. This is more aligned to how information is normally categorised, it is comprised of a hierarchical list which contains both a code and description. This is covered in ISO 12006-2:2015. This includes OmniClass in the US and Uniclass 2015 in the UK.
In terms of IFC, layers and classification are not properties. They are actually entities (see blog post 02). They have their own special place in the schema and have attributes attached to them. These entities are associated to other entities like IfcBoiler, IfcBuilding or IfcSpace through those important relationships.
-
Layers are handled by the entity IfcPresenationLayerAssignment
-
Classification is handled by the entity IfcClassificationReference
The next sections will describe different methods of exporting these to IFC from Revit.
Important terminology
- Metadata – data which describes data
- Object – this refers to anything. It could be a whole project, a building, a space, an element like a wall or boiler or a document
- String – a sequence of characters (words or numbers)
- Syntax – the rules which govern the arrangement of characters
LAYERS
Although in Revit we don’t use layers, it may come as a shock that we can actually export them to IFC and furthermore they are located within the correct place in the schema.
Because layers are entities, and they don’t’ exist as a family in Revit therefore we have to cheat a little. There are two ways in which this can be done; at category level and at family level (like IFC entities).
Entity mapping – Categories (Globally)
It’s useful to map at a category level because it reduces having to apply the mapping to each individual family type. Like entities this method tends to work better for system families and most structural elements, as the alignment is more one to one.
However, unlike entities there is no shiny dialogue box to use, so we have to update a text file. As a starting point you can take a copy of the one from the following location:
C:\ProgramData\Autodesk\<Revit version>\exportlayers-dwg-BS1192.txt
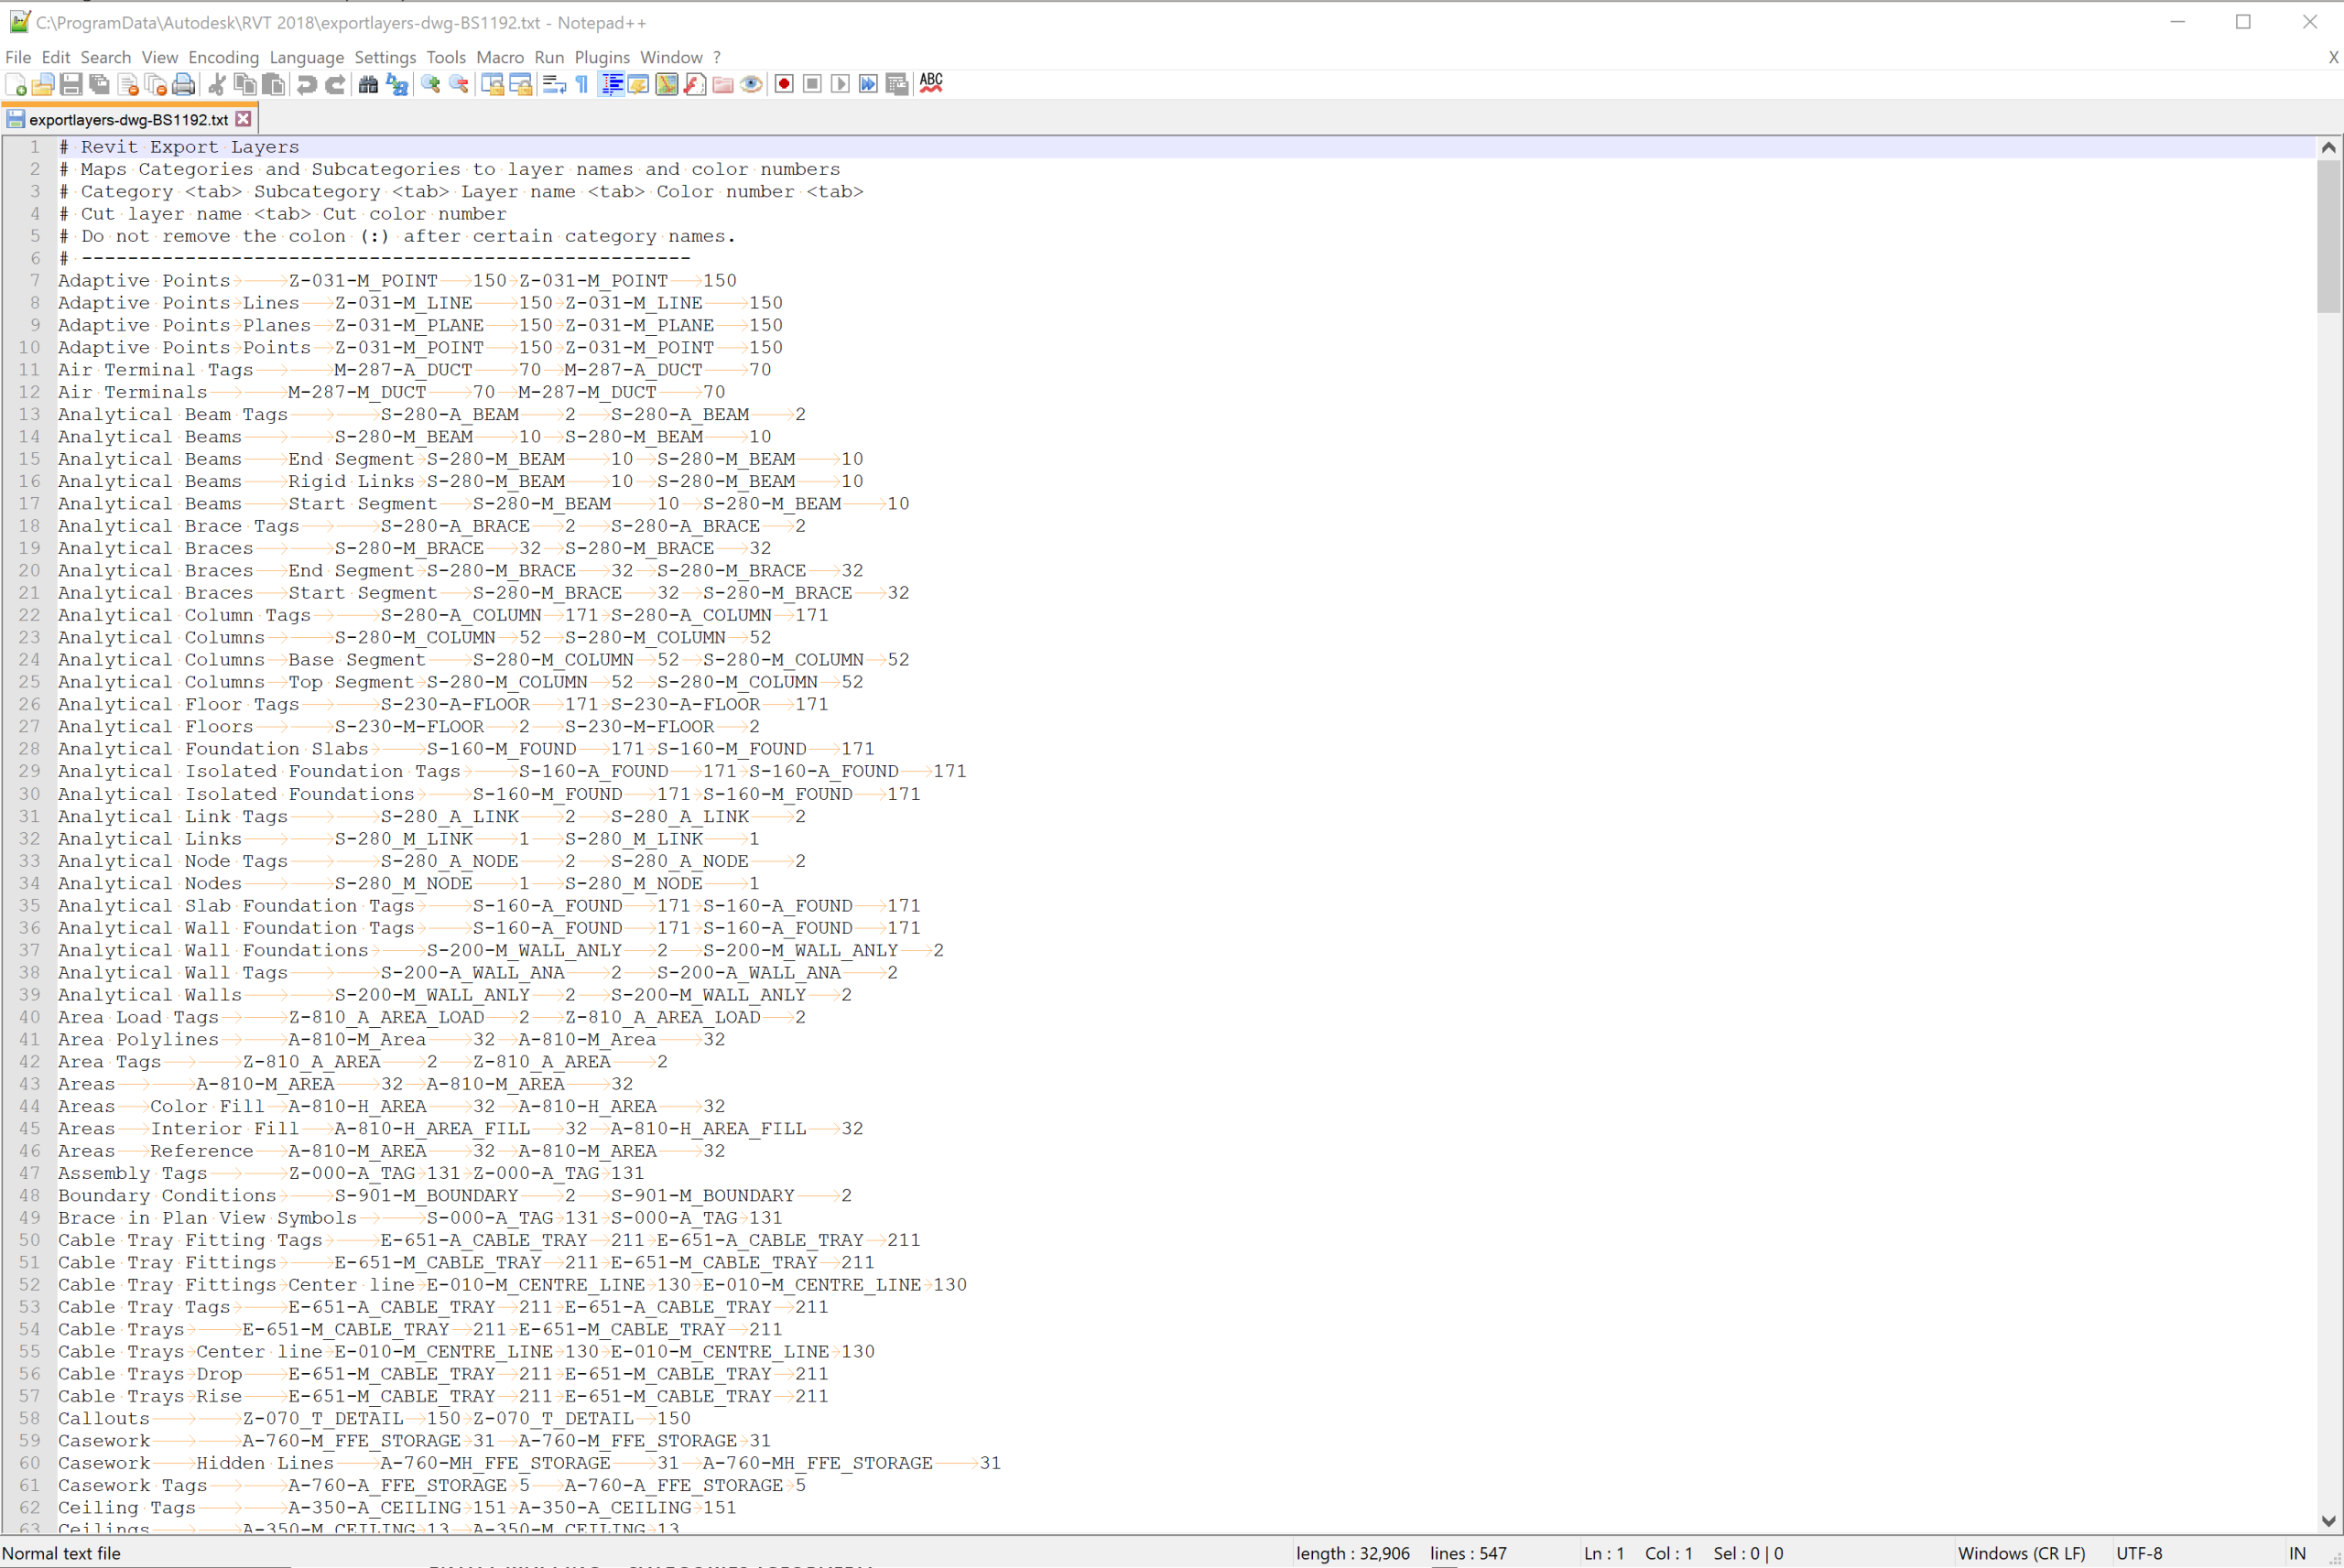
Image: exportlayers-dwg-BS1192.txt
The difference between this file and the one used for entity mapping in blog post 02 is that this file shows an example of the categories being mapped to layers.
The file is also similar to the default BS1192 layer settings used in the DWG export dialogue box. However, this dialogue box is not actually using this text file.

Image: ModifyDWG/DXF Export Setup in Revit
Since ‘BS1192’ has been used in the name of this file I’m not sure if this is available with non-UK installs of Revit and I have had experiences where these files don’t install properly, so if you don’t have it you can create it yourself from a blank text file.
The syntax is: <Revit Category Name><tab><tab><Layer Name>
If you do use this file it’s important to understand that even though it says BS1192, the layer naming is out of date (by quite a bit!) so you will have to update the file by using correct layer names.
Once your layer mapping file has been created next you need to record the file path of where it has been saved. When Revit starts up it takes some of its settings from a file called Revit.ini there are two of these files, but we just need to update the local one.
This can be found in the following location:
C:\Users\<USER>\AppData\Roaming\Autodesk\Revit\Autodesk Revit 20xx
Before we carry on, I must stress that this is a start-up file so you may not be able to access it and if you have a BIM/Revit manager you should talk to them first before you alter it.
-
The file does recreate itself if deleted but it’s wise to create a copy and name it Revit_Original.ini, this is the original file which can be used as a back-up or to revert to the previous set-up.
-
Open up the new Revit.ini file and add the file path of the layers file after ExportLayersNameDGN=
-
Example: ExportLayersNameDGN=C:\Users\<USER>\Documents\RevitLayerFile.txt
Once saved the layer file recorded in the Revit.ini file will be assigned to the IFC export every time, until the Revit.ini file is changed again.
-
To revert to the original ini file, rename the new one and change the file name of Revit_Original.ini back to Revit.ini
And that’s it, you don’t need to think about it anymore. Every time an IFC is exported all elements on a particular category will be mapped to the layer set up in the text file. Just remember if you ever change machine or use another computer this will need setting up again.
However due to the misalignment of Revit categories and IFC entities there will be times where it needs to be done at a family level.
ENTITY MAPPING – FAMILIES (ONE TO ONE)
At a family level layers can be assigned using the override parameter IfcPresentationLayer (note,IFC CAD Layer can also be used). So regardless of what is assigned at category level this parameter will override that.
In this example IfcPresentationLayer has been populated for a boiler in Revit.
![]()
Image: Revit Type properties dialogue box
When this is exported to IFC you can see in the image below the correct part of the schema has been populated with the correct layer name.

Image: Identity information for IfcBoilerType in Solibri
Again, due to the mismatch of Revit categories and entities this method will apply more to building services and some architectural elements. To help the manual process of adding values you can use the Classification Manager for Revit and configure it to populate the parameter IfcPresentationLayer by selecting the correct layer from a list.
Making sure layers are correct in IFC is particularly important if you are working on a project where GRAPHISOFT ARCHICAD is being used as this is the primary way objects are structured.
CLASSIFICATION
Exporting classification to IFC is a different process, if we refer back to the IFC schema there are in fact two entities for classification:
-
IfcClassificationReference
-
IfcClassification
IfcClassificationReference
This entity holds the familiar code and description. Depending on what you are referring to these two components are called slightly different things.
| IFC terminology | Uniclass 2015 terminology | |
| Alphanumeric code | ItemReference | Code |
| Description | Name | Title |
For this blog I will use the Uniclass 2015 terminology as this is easier to remember.
In Revit this information is exported from user-defined parameters. I’m sure some of you are now thinking the Classification Manager automatically provides parameters. This is correct but in Revit to export to IFC a single parameter is required for both the code and title.
There are no official shared parameters for these (not even from NBS) so I use the following:
- Uniclass2015_En
- Uniclass2015_SL
- Uniclass2015_Pr
- Uniclass2015_Ss
When I first started looking at this, I had one parameter for all tables, but requirements of different projects meant that the flexibility of separating them proved more useful, but this is down to the users on the project like wit anything though try and find some consistency.
With these parameters it doesn’t matter what they are called, but the names must be listed in the IFC Exporter (see IFC Exporter section below).
To populate the parameters, use the code followed by the title separated by a colon1
1A space can be included before or after the colon if preferred.
Examples:
- En_20_70_40: Law court buildings
- SL_25_10_04: Art classrooms
- Pr_60_60_08: Boilers
Another attribute of IfcClassificationReference is Location this is populated from the IFC Exporter as described later.
IfcClassification
This allows information about the classification system to be included within the IFC and this includes:
- Name
- Source
- Edition
- Edition date
This is particularly important since the Uniclass 2015 tables are updated every 3 months, it’s important to know which versions of the tables have been used.
Within Revit (apart from Uniformat) only one other classification system can be fully2 defined for IFC export and the export set-up for this takes place within the IFC Exporter.
Ideally the primary classification system should be the one which your country or region associates with ISO 12006-2, in the UK this would be Uniclass 2015 and in the US OmniClass.
2as noted later in the blog ‘edition date’ doesn’t work.
IFC Exporter set-up for the primary classification system
To set-up the primary classification this has to be done through the IFC Exporter using the Classification Settings button on the Property Sets tab.
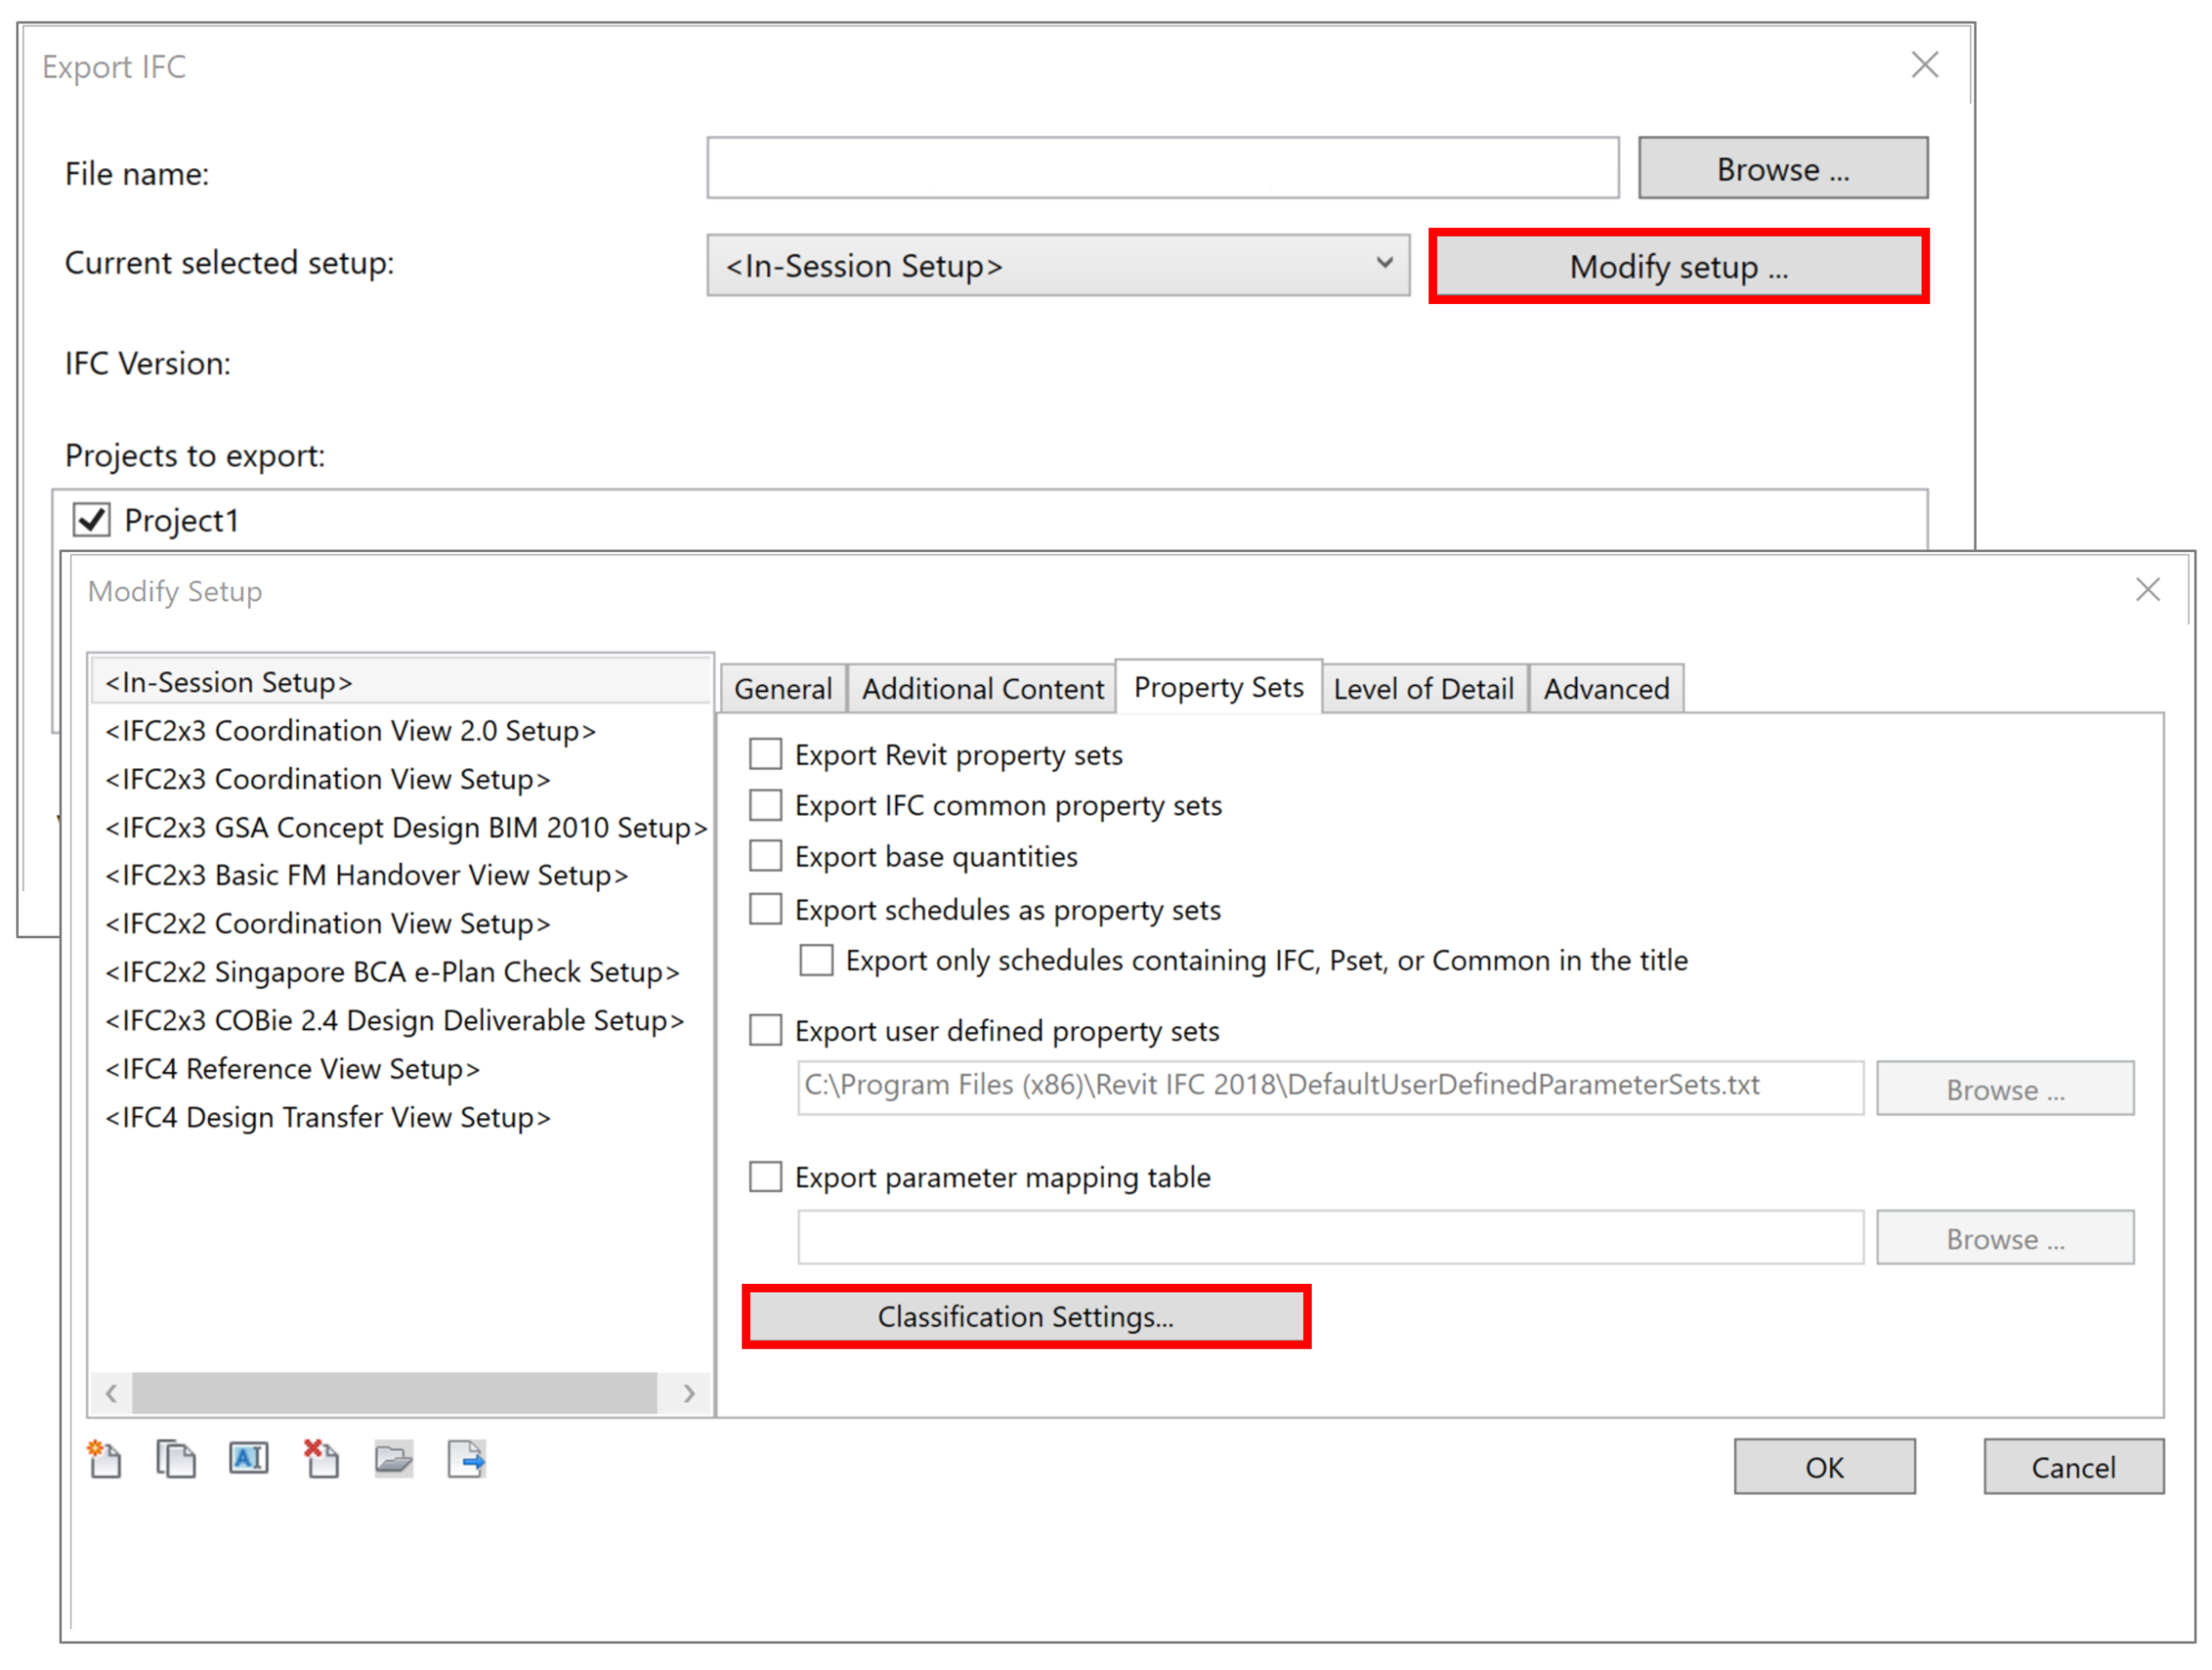
Image: Classification settings location in the Revit IFC Exporter
Selecting this button will open up a separate dialogue box with various empty boxes to populate.
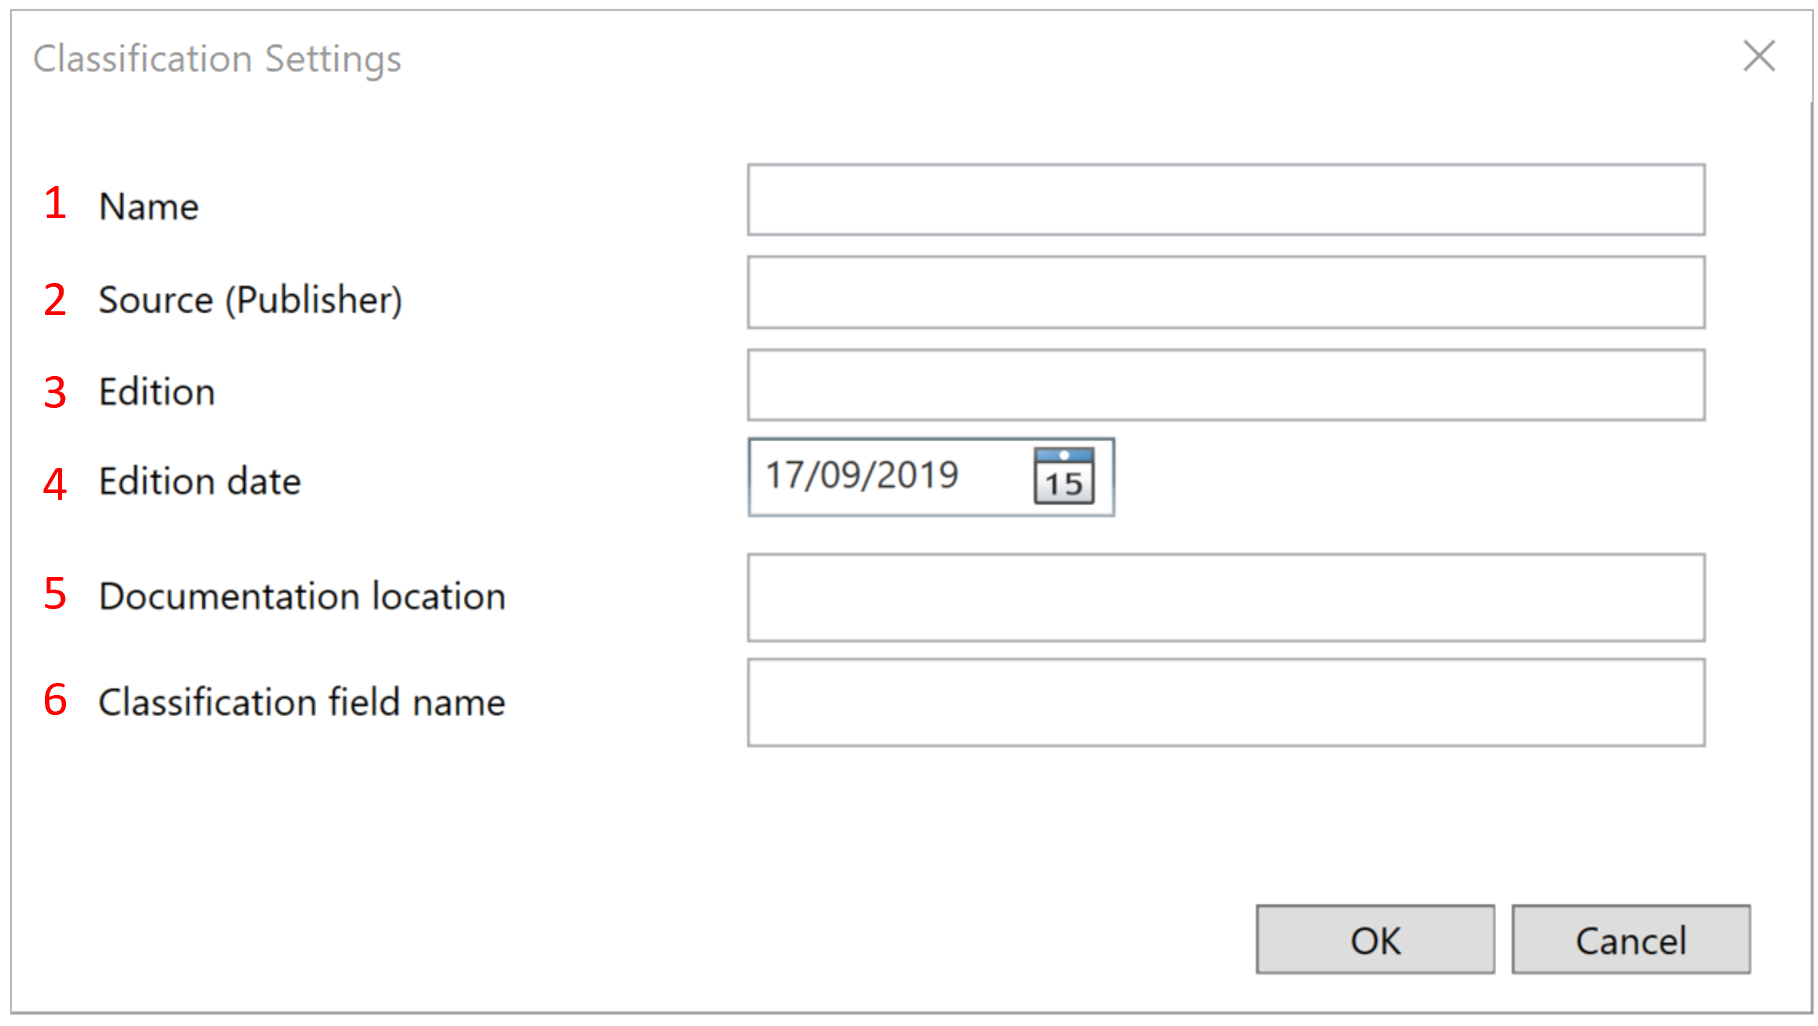
Image: Classification settings dialogue box in the Revit IFC Exporter
- Name
The name of the classification system.
- Source
The organisation responsible for publishing the system.
- Edition
This is to record the version. However, because the Uniclass 2015 tables are updated at different rates I list the version of each table.
- Edition date
Only one date can be entered here, so for Uniclass 2015 I use the overall date when the tables were updated. Note, there is a bug at least in the 2018 IFC exporter – this doesn’t export
- Documentation location
This populates the attribute ‘Location’ assigned to IfcClassificationReference. For Uniclass 2015 I add the URL to the webpage
- Classification field name
Populating this enables the custom classification parameters added to the model to be mapped to IfcClassificationReference. Add each of the parameters and separate them with commas.
Once this is populated and the IFC model is exported, how do we know if it’s correctly populated in the exported IFC?
In a model viewer such as Solibri there will be a separate location for Classification data (remember this isn’t a property). In the image below selecting the classification tab you will see that the listed IFC classification entities and attributes have all populated. For some reason in Solibri it doesn’t show the source and the other information like edition (which is in the IFC).
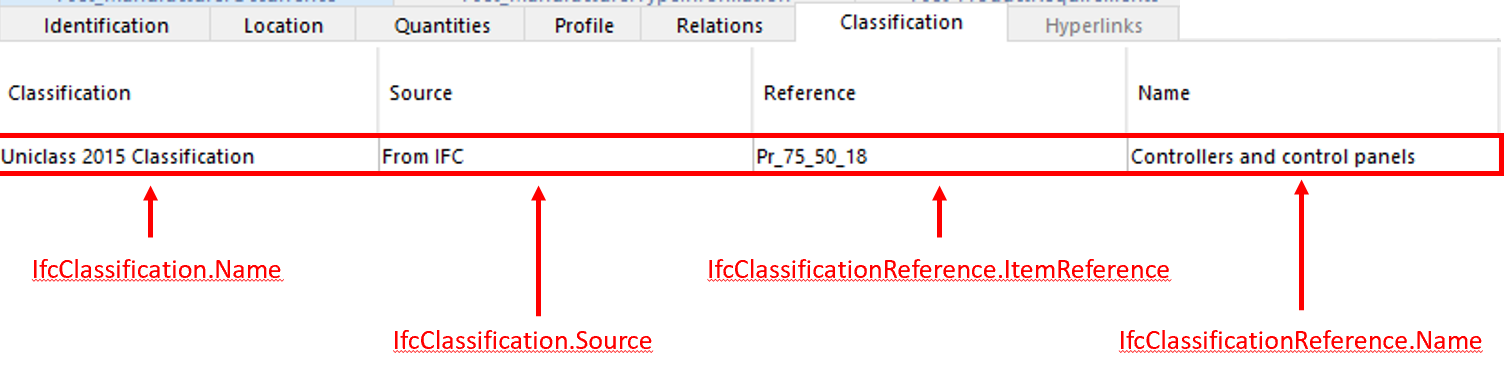
Image: IfcDistributionFlowElement Classification tab in Solibri
To view this information, you would need to look at it using another viewer or read the IFC STEP file.

Image: IfcDistributionFlowElement Classification tab in DDS CAD
Secondary classification systems
There will be projects which request additional classification3to be used such as NRM, SFG20. These can’t be configured through the IFC Exporter but there are some parameters provided by Autodesk which allow these to be added:
- ClassificationCode
- ClassificationCode(2)
- ClassificationCode(3)
- ClassificationCode(4)
- ClassificationCode(5)
- ClassificationCode(6)
- ClassificationCode(7)
- ClassificationCode(8)
- ClassificationCode(9)
- ClassificationCode(10)
3For the purposes of this blog I have grouped all classification systems, vocabularies, taxonomies, lists and rules under the umbrella term ‘classification’.
These allow a hybrid of IfcClassification and IfcClassificationReference to be added to the one parameter, which means we can add additional classifications even though in terms of IfcClassification it only allows the name of the classification to be added no other data.
The syntax is as follows:
[ClassificationName] Code: Title
Examples:
- [NRM1] En_20_70_40: Law court buildings
- [SFG20] SL_25_10_04: Art classrooms
- [Client custom] Pr_60_60_08: Boilers
- [Classification A] A_01_01: Title 01
- [Classification B] A_02_02: Title 02
- [Classification C] A_03_03: Title 03
Once exported to IFC selecting the IFC entity and looking at its classification should show something similar to below.

Image: IfcSpace Classification tab in Solibri
IfcZone
To add a classification to the IfcZone entity again in Revit there is a pre-determined parameter to use:
ZoneClassificationCode
Like the two zone parameters in blog post 04 this is an instance parameter which needs binding to the Rooms category.
This uses the same syntax as above [ClassificationName] Code: Title
Once exported to IFC selecting the IfcZone entity and looking at its classification should show something similar to below.

Image: IfcZone Classification tab in Solibri
Revit Assembly Code
Another way of exporting classification from Revit is by using the Assembly Code text file with the assembly hardwired type parameters. This will only export using the US Uniformat classification system. If you use the assembly code text file it takes the classification code and adds it to Assembly Code and the classification title and adds it to Assembly Description.

Image: Revit Type properties dialogue box
When exported to IFC, this automatically populates the code and title for IfcClassificationReference without having to do anything further.

Image: IfcDistributionFlowElement Classification tab in Solibri
The Assembly Code text file structure is very similar to the Classification Manager database files, however it is much more fixed as you cannot change the parameters which are populated.
It’s also fixed in terms of the IfcClassification values (if anyone knows of a way in which this can be unfixed let me know). It will automatically export the following attributes for the Uniformat classification system:
- Name
- Source
- Edition
This is great if the project is using Uniformat but it does make it unusable for other classification systems. Another issue I have found with this is even if you don’t populate the Assembly Code parameters there will always be an entry for Uniformat in IfcClassification within the IFC. It would be great if this could be removed.
Populating values: Classification Manager
As we discussed since Revit doesn’t allow us to select values from dropdown lists this is where the Classification Manager becomes useful. This could be potentially used to populate any of the parameters noted in this blog post.
One of the plus points about the Classification Manager is it is very simple to reconfigure. They are XLSX files which can be found in the following location:
C:\Program Files (x86)\Autodesk\BIT\<version number>\Classification Manager
You will notice there are several database files and they all work in the same way. Like the IFC one discussed in blog post 03.
If we open the Classification Manager Database UK.xlsx file and go to one of the table tabs you will see the following.
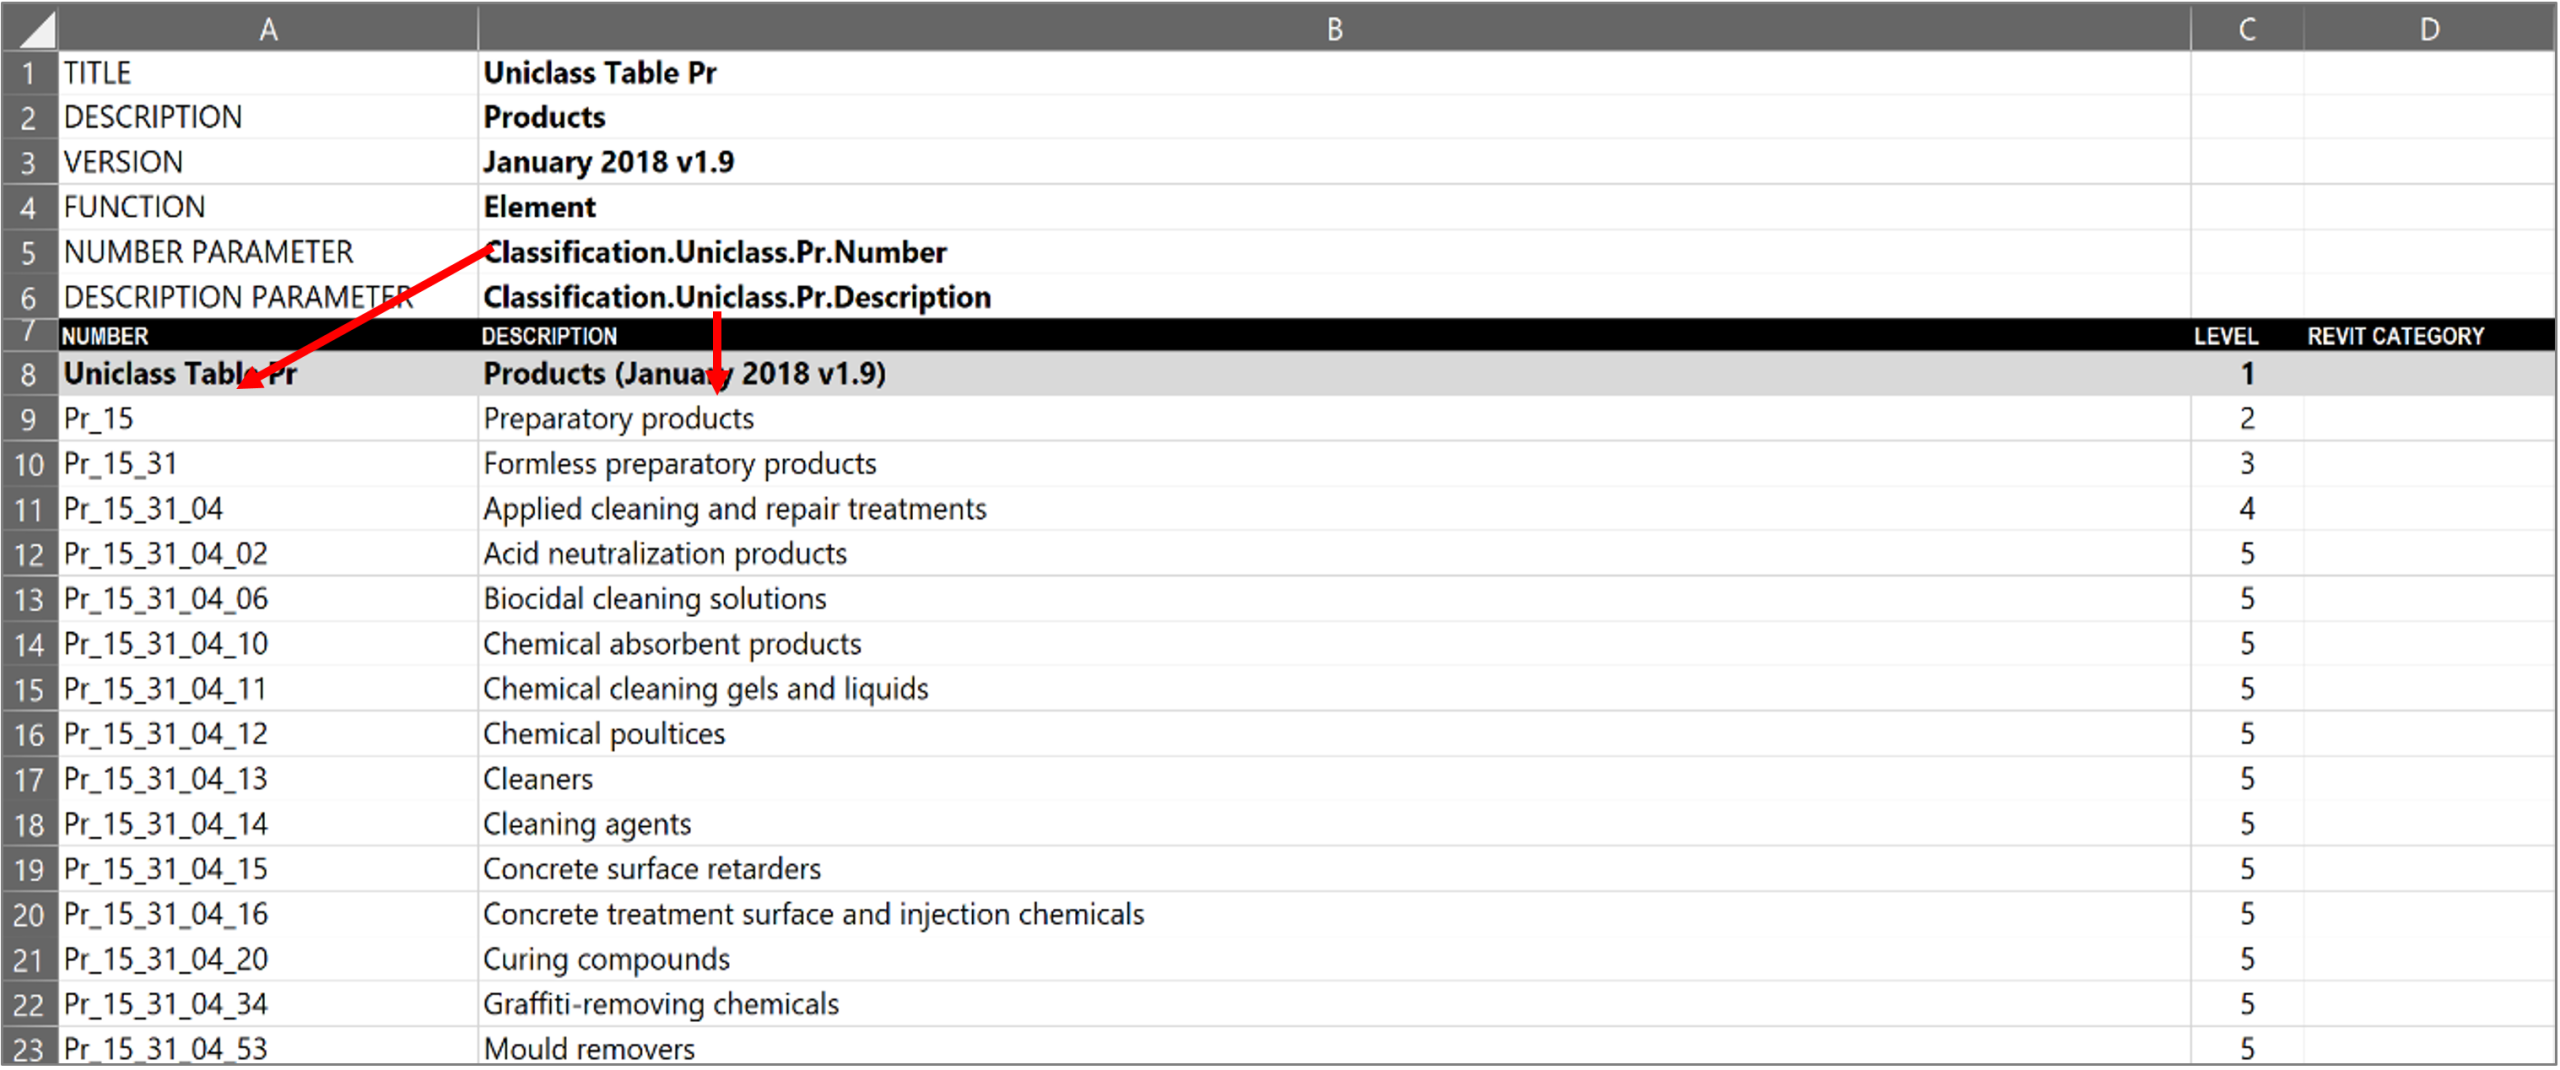
Image: Classification Manager Database UK.xlsx
Using the above methods for classification means that the out of the box classification manager database files won’t work because they populate two separate parameters when we need it to populate just the one.
In addition, since systems like Uniclass 2015 are being updated regularly you will have to configure these files at some point to ensure the agreed table versions are being used when a new project commences.
The values listed in column A populate the parameter recorded in cell B5 and the values listed in column B populate the parameter recorded in cell B6. The values of these two cells and the lists below can be amended to suit the methods used in this blog.
SUMMARY
After reading this blog you should now understand the importance of Layers and Classification to allow construction information to be ordered and grouped and how they differ from the master IFC schema.
You will also recognise that they are IFC entities in the schema not properties, therefore need to be treated differently. If layer and classification data is located within a property set within an IFC model, then it’s not correct.
There have been many methods described to export layers and classification and what to look out for when checking the IFC.
In the next blog we will look at the Revit IFC Exporter settings as well as some more modelling based guidance.
Emma Hooper, Associate Director, Bond Bryan Digital Ltd
Terms and conditions
All content provided on this Knowledge Hub is for informational purposes only. The owner of this Knowledge Hub makes no representations as to the accuracy or completeness of any information on this site or found by following any link on this site. Bond Bryan Digital Ltd will not be liable for any errors or omissions in this information nor for the availability of this information. Bond Bryan Digital Ltd will not be liable for any losses, injuries, or damages from the display or use of this information.
We are happy for others to share our Knowledge Hub pieces through all social media platforms. You may include links to the original blog pieces and use part of the Knowledge Hub to then provide a link to the original content. However we would appreciate it if the content is not reproduced in full on other sites or publications without written consent being granted by Bond Bryan Digital Ltd.
This policy is subject to change at any time.
Related Articles

IFC (Industry Foundation Classes) – Part 04 – IFC Attributes in Autodesk Revit
In blog post 01 we described what Attributes are and listed the four core ones: GlobalId OwnerHistory Name Description


IFC (Industry Foundation Classes) – Part 05 – IFC Properties in Autodesk Revit
In the last blog post we looked at IFC attributes which allows you to add certain basic information about IFC entities. However, we need to be able to add much more information (such as performance) to entities, to do this we use properties.