


IFC (Industry Foundation Classes) – Part 03 – Predefined Types in Autodesk Revit

INTRODUCTION In this blog we are going to skip the main section on Attributes (see the next blog) and focus on one specific Attribute the Predefined Type as this is closely related to Entities. In blog post 01 we explained that Predefined Types were the next level below Entities in determining what something is. For example for IfcBeamType the Predefined Types are:
- BEAM
- JOIST
- LINTEL
- T_BEAM
- USERDEFINED
- NOTDEFINED
REVIT – IFC COMPARISON In blog post 02 we discovered that the alignment of Autodesk Revit Categories and IFC Entities is not one-to-one. Adding Predefined Types into the mix complicates this further as in some cases multiple Revit Categories map to different Predefined Types within one IFC Entity. Example, IfcCoveringType has the following Predefined Types:
- CEILING
- CLADDING
- FLOORING
- INSULATION
- MEMBRANE
- ROOFING
- SLEEVING
- WRAPPING
- USERDEFINED
- NOTDEFINED
These could be represented by many Revit Categories such as; Ceilings, Duct Insulations, Floors, Pipe Insulations, Roofs and Walls (these are represented by the different colours in the image below).  Image: BBD Revit test file categories view, predefined types mapping within one entity (click to enlarge) Other such Entities will include:
- IfcFireSuppressionTerminal
- IfcFlowInstrumentType
- IfcMember
- IfcPlate
REVIT SETUP – FIRST METHOD In the blog post 02 we mentioned that the IFC Export Classes dialogue box wasn’t suitable for exporting IFC Predefined Types, which means it cannot be done at a Category level. Therefore, it has to be done at the element level using the parameter IfcExportType this should be bound to the project or family in the same way as IfcExportAs. Therefore, going back to the Boiler example: IfcExportAs = IfcBoilerType IfcExportType = STEAM (or WATER, USERDEFINED or NOTDEFINED) The floor finish example: IfcExportAs =IfcCoveringType IfcExportType = FLOOR I’m still not convinced that we should be using capital letters for this value but that’s how it is documented on the website and using other programming languages (apart from XML) so until this changes we’re going to stick to using capitals.
REVIT SETUP – SECOND METHOD Another method of achieving the same outcome which you may have seen documented is that you can combine the entity and Predefined Type values within the IfcExportAs parameter separating both values by a decimal point. Example: IfcExportAs = IfcBoilerType.STEAM IfcExportAs = IfcCoveringType.FLOOR This method has driven me slightly mad over the years because it would never work, however knowing Revit I thought I’d better test it again before I write this blog and guess what it’s now working! I decided to investigate further just for my own sanity and it appears to have been fixed in the last two releases of the IFC exporter (18.3.2 and 18.4.0). In previous IFC exporter versions (in Revit 2018) it doesn’t work. My personal preference is to stick with the two separate parameters as they are two separate pieces of data and I like to use them to sort and filter my information in Revit. This leads us on to a subject I touched on in the last blog post, the Classification Manager. You may think this tool is just for adding classifications like Uniclass 2015 or OmniClass but actually it allows the user to populate parameters from any list of values. Have you ever wanted to click on the empty box next to a parameter and have a list of all the possible values in could be and select it there and then? Well because Revit can’t to that then this is the next best thing. The Classification Manager can be configured to include any values you wish as it uses Excel files as its database. This functionality makes it handy to help us populate IfcExportAs and IfcExportType. The install does come complete with an XLS file which contains IFC values. However, there are drawbacks:
- It’s for buildingSMART’s IFC4 schema (which we aren’t using yet).
- It lists the whole element tree including super entities (which is nice from an IFC point of view, but it’s not really required from a Revit point of view and if anything confuses the user).
- It only populates IfcExportAs using the combined Entity and Predefined Type values I mentioned above.
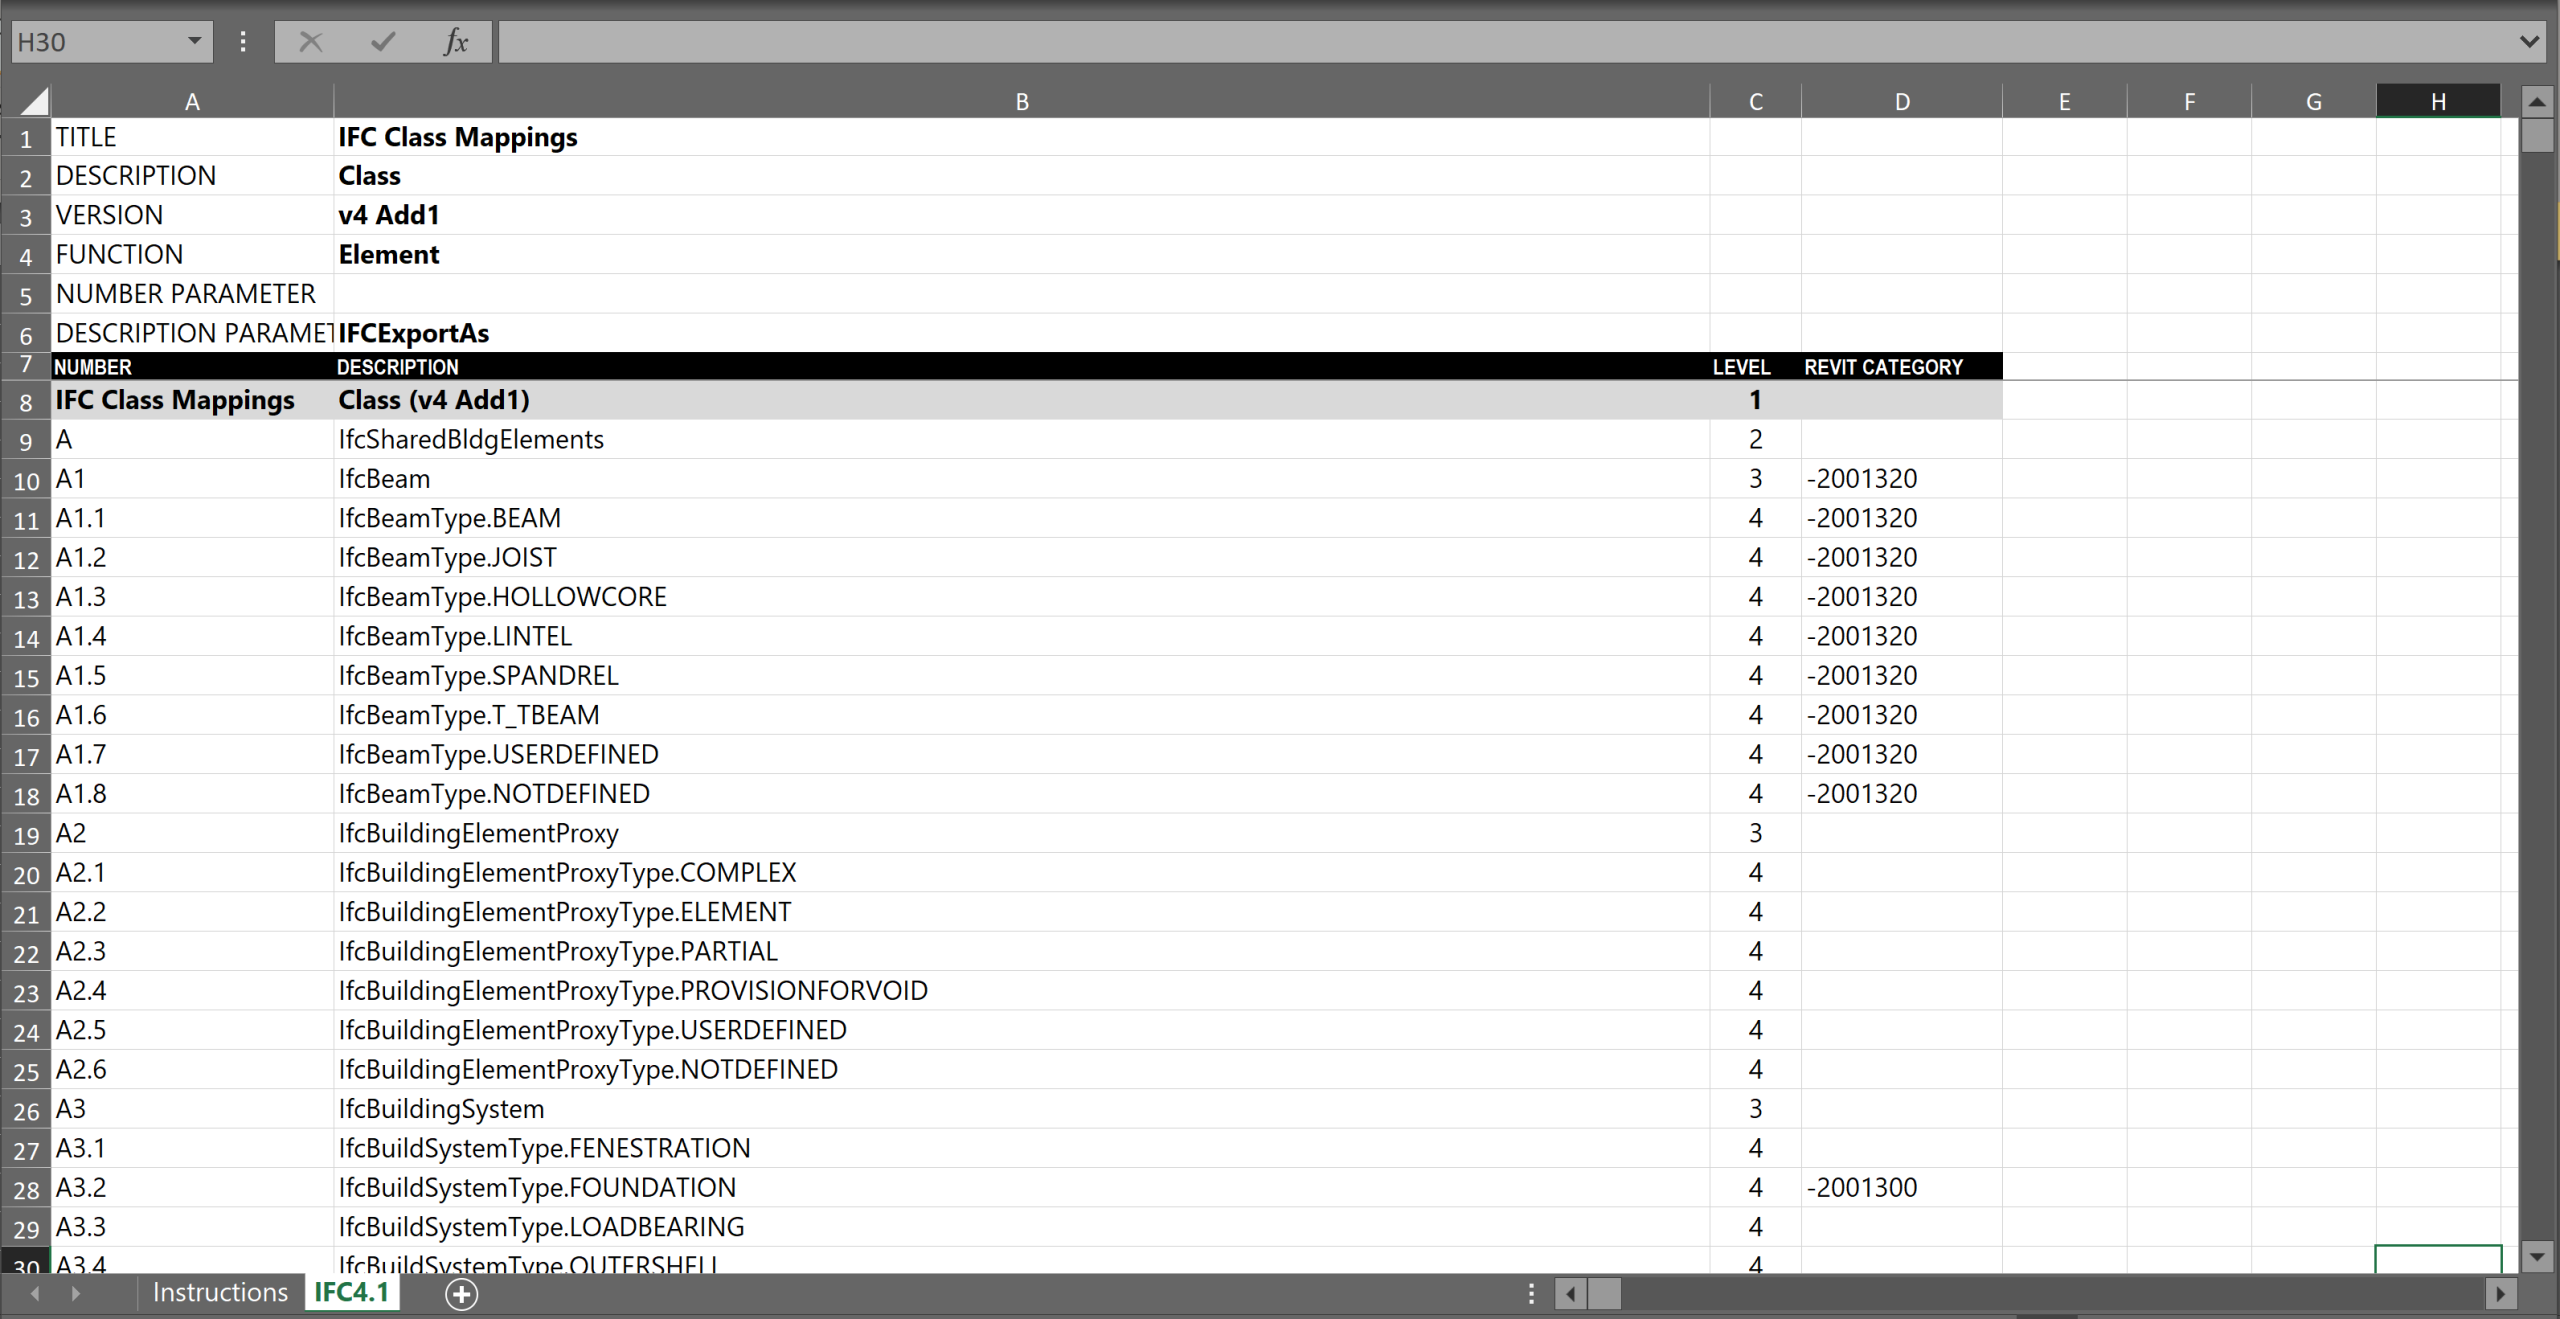 Image: The default Classification Manager Database IFC for Autodesk Revit (click to enlarge) Therefore, I created my own which:
- Uses the buildingSMART IFC2x3 schema.
- Only uses the lowest level entities.
- Populates both IfcExportAs and IfcExportType at the same time. So using the two separate parameters is no slower than using one.
USERDEFINED and NOTDEFINED USERDEFINED and NOTDEFINED tend to be listed in every enumerated list and these actual values should be used to populate IfcExportType (or IfcExportAs if using method 2). We mentioned in blog post 01 that NOTDEFINED was for early stage design when you don’t know what the Predefined Type will be. There are 465 element based Predefined Types in the IFC2x3 schema and you should always try and use these as your starting point. However, there will be times when you have an element which doesn’t fit into what’s already there or the particular entity forces you to create a custom value. This is when you use USERDEFINED. Again, in blog post 01 we mentioned that the actual custom value for USERDEFINED could be recorded in the IFC attributes ElementType (for types) and ObjectType (for occurrences). In Revit there just so happens to be two handy parameters we can use.
- IfcElementType (bind as a type property)
- IfcObjectType (bind as an instance property)
Before the 18.4.0 version of the IFC exporter IfcElementType only worked for Furniture entities but it seems to be working for all now, which was one of my wishlist items (Thank you Autodesk ☺) So, which one do you populate? I’ve devised a rule of always populating IfcElementType first but if there are Entities which don’t have Types (e.g. IfcElectricDistributionPoint, IfcFooting and IfcPile) I then use IfcObjectType. Example 1: IfcExportAs = IfcBoilerType (or IfcBoilerType.USERDEFINED) IfcExportType = USERDEFINED IfcElementType = <Custom boiler type*>  Image: ElementType shown in DDS-CAD (click to enlarge) Example 2: IfcExportAs = IfcPile (or IfcPile.USERDEFINED) IfcExportType = USERDEFINED IfcObjectType** = <Custom pile type*> At the time of testing the Predefined Types for IfcPile (and IfcFooting) are not exporting correctly.
 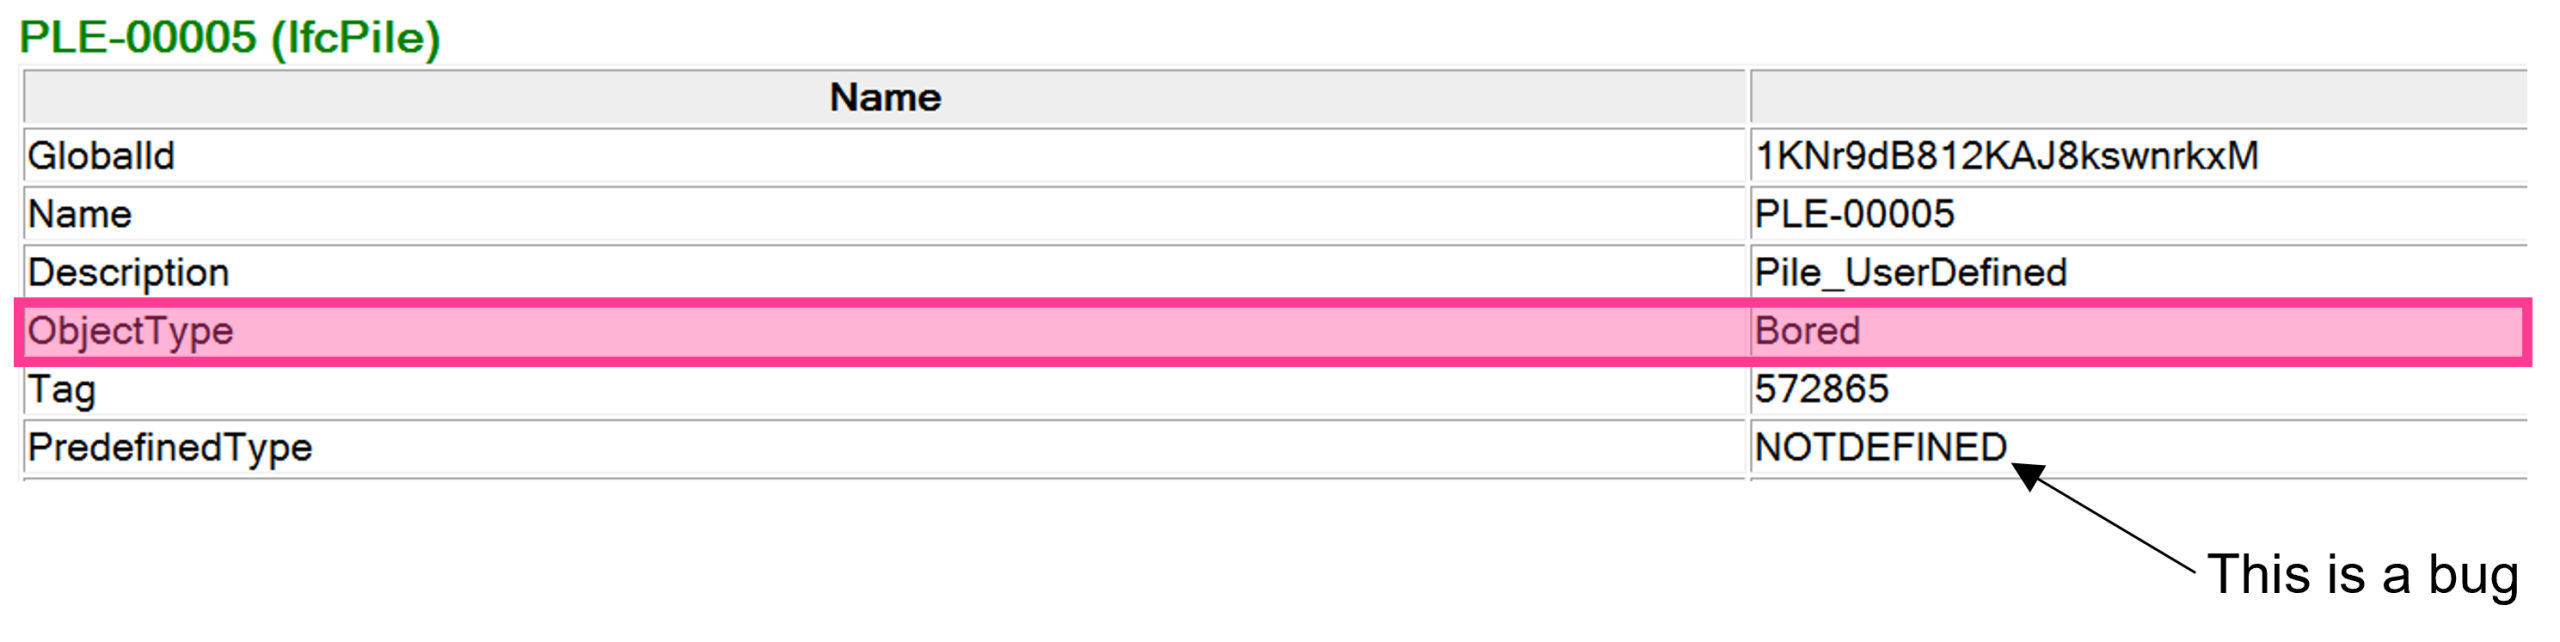 Image: ObjectType shown in DDS-CAD (click to enlarge) *I cannot find any instruction on how to format this value, so I would suggest sentence case, keeping the value short and keep it quite high level (further detail can be added in the description attribute). If anyone knows the answer to this then please let us know. **By default Revit populates this IFC attribute with the concatenated values Family:Revit Type
OTHER BITS AND BOBS The IfcElementType parameter has always proven useful for the Furniture entities as these don’t have Predefined Types in IFC2x3 so it’s a place to define the Furniture entity more. Here are some examples: Furniture IfcExportAs = IfcFurnitureType IfcExportType = <Don’t fill this in> (If using the Classification Manager with method 1 just use USERDEFINED as you have to add a value) IfcElementType = Chair (there aren’t official predefined types in IFC2x3 but instead a list of furniture types on the buildingSMART website. These are a good starting point) System Furniture Elements IfcExportAs = IfcSystemFurnitureType IfcExportType = <Don’t fill this in> (If using the Classification Manager with method 1 just use USERDEFINED as you have to add a value) IfcElementType = Worksurface (there aren’t predefined types in IFC 2×3 so for now I use the ones from IFC4) I should point out that doors and windows are different to other entities in IFC2x3. Rather than IfcDoorType or IfcWindowType there is IfcDoorStyle and IfcWindowStyle. Exporting these in the past used to be a pain, but now as long as you have used the door and window Revit Categories and you have set-up the IFC Export Classes dialogue boxcorrectly you don’t even need to fill in the parameters. However, if you do need to populate IfcExportAs use the values below. Doors IfcExportAs = IfcDoor IfcExportType = <Don’t fill this in> (If using the Classification Manager with method 1 just use USERDEFINED as you have to add a value) Windows IfcExportAs = IfcWindow IfcExportType = <Don’t fill this in> (If using the Classification Manager with method 1 just use USERDEFINED as you have to add a value)
SUMMARY In this blog post we have focused on three specific Attributes which help us to further define the IFC data structure further. For IFC Predefined Types we explored two different methods the first using the IfcExportType parameter. We also introduced two more parameters IfcElementType and IfcObjectType to help with providing more detail to USERDEFINED Predefined Type elements. In the next blog we will explore Attributes further and how we can successfully export them from Revit.
Emma Hooper, Associate Director, Bond Bryan Digital Ltd
Terms and conditions
This policy is subject to change at any time.
Related Articles

IFC (Industry Foundation Classes) – Part 05 – IFC Properties in Autodesk Revit
In the last blog post we looked at IFC attributes which allows you to add certain basic information about IFC entities. However, we need to be able to add much more information (such as performance) to entities, to do this we use properties.


IFC (Industry Foundation Classes) – Part 06 – Layers and Classification in Autodesk Revit
INTRODUCTION Welcome back everyone ☺ I hope you’ve all had fun testing the workflows in the previous blog posts. As I’ve explained IFC provides a good basic method of structuring information, we should think of this as the default way which should be used across every project and every information management activity. In addition to […]