


LEGO Architecture meets BIM – Part 18: Sequencing Part 2
Introduction
In the last post of the LEGO Architecture meets BIM series we looked at how we could create a fairly primitive sequence using GRAPHISOFT ARCHICAD. The first post on sequencing can be found here if you haven’t read it yet. Much of this approach required a manual process to setup and configure to get a useful output. In this post we look at how a building sequence can be achieved outside of our authoring tool and in a more automated way in Solibri Model Checker.
So in this post we look at how we can use data from a model to create an automated sequence. In this particular case we are primarily using the data from the Layer but that was primarily to demonstrate the workflow in ARCHICAD. If this method was solely used we could simply add a Property to each piece to create the exact same output.
The workflow demonstrated here is not simply limited to sequencing and the steps could be used to create a number of different types of presentations in an intelligent manner. For example presentations could be created to show different floors of a building or isolate different departments/zones for conversations with others.
Creating an Information Takeoff
So initially we need to create an Information Takeoff schedule within Solibri Model Checker 9.7.
Out-of-the-box there is a tab in the top bar simply titled ‘Information Takeoff’. We navigate to this and chooses the ‘New Information Takeoff Definition’ button.
Information Takeoff in Solibri Model Checker is often simply referred to as ITO for short.
This allows us to Name the Takeoff schedule, add a Description and then select the items we wish to include or exclude. In this case we want all the model elements but want to exclude the Spaces.
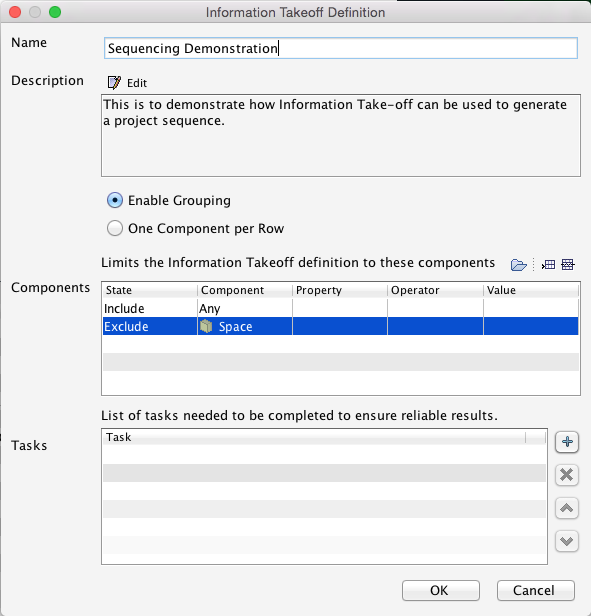
Image: Information Takeoff Definition (click to enlarge)
Once we have created the Information Takeoff we then need to add the data we want to use to generate our sequence.
In this case we are primarily using the Layer, although the Component Name aligns with the sequence so this could have been used as an alternative. Solibri allows pretty much all data in the model to be scheduled in an Information Takeoff so the limits of the process are on the quality of the data available.
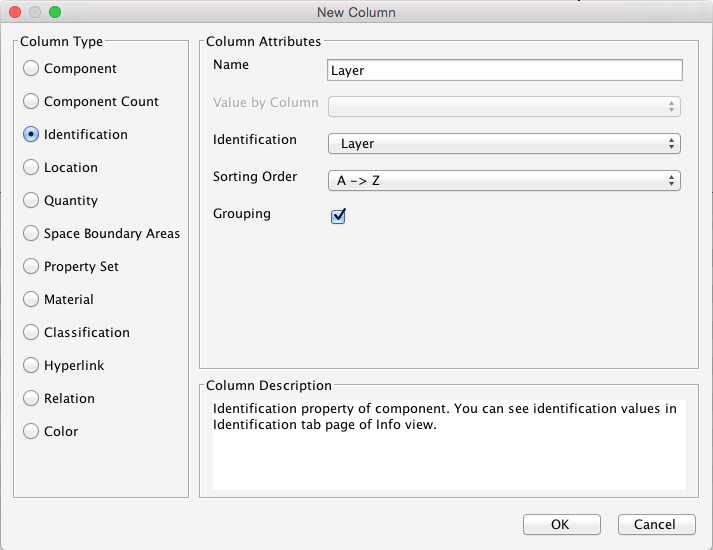
Image: Adding Columns to the Information Take-off (click to enlarge)
Once we have chosen the data for creating the Information Takeoff we end up with a schedule like the one below. Here you can see that every line of the schedule is represented by a different colour.
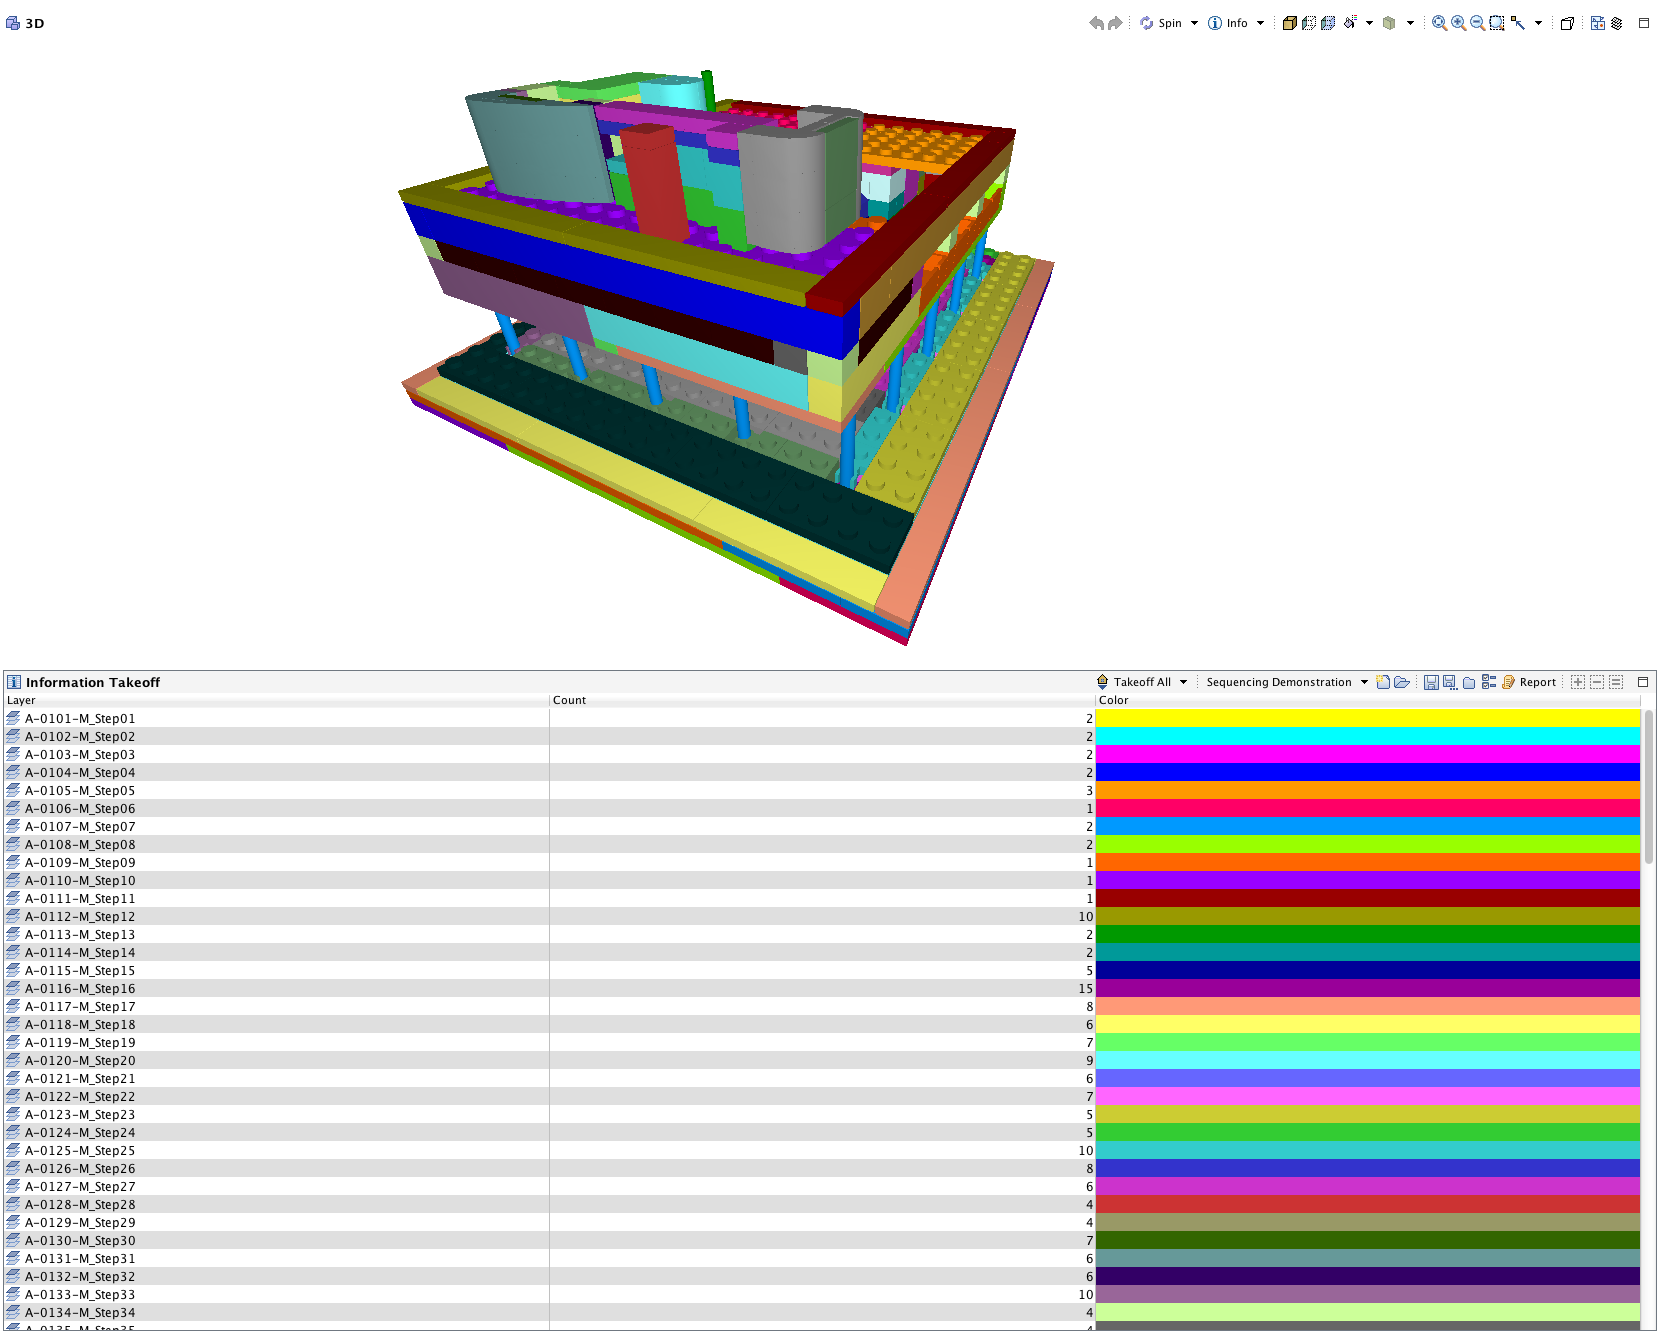
Image: The Information Take-off and the complete 3D model (click to enlarge)
Creating a Sequence from a Presentation
Now that we have an Information Takeoff created, we can move on to creating a Presentation.
This can be done in the Communication tab of Solibri Model Checker.
Simply choose New Presentation from the Presentation View and the following dialogue will open.
We can then Name this ‘Presentation’ and then choose ‘From Information Takeoff Results’. You can then select the required Information Takeoff which in this case is called ‘Sequencing Demonstration’. The number in brackets represents the number of lines in the Information Takeoff. So we have 137 steps in total to build 659 elements.
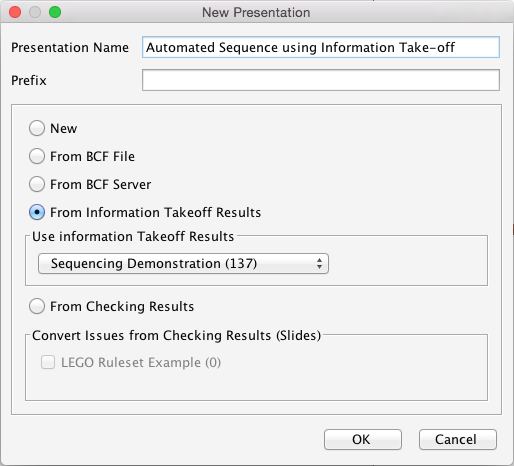
Image: Creating a New Presentation (click to enlarge)
Once we hit OK the following dialogue opens. We have a few more options available here.
As we want to create a sequence we want to include each of the previous steps so we select ‘Include Previous Rows’.
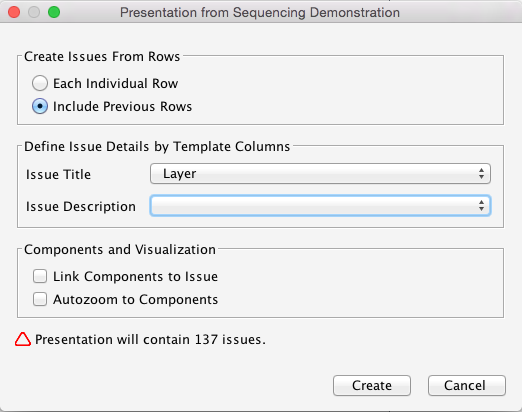
Image: Dialogue to setup how we wish to create the Presentation (click to enlarge)
We then simply choose Create.
The Sequence
Once you choose Create, Solibri Model Checker automatically creates each step as an ‘Issue’.
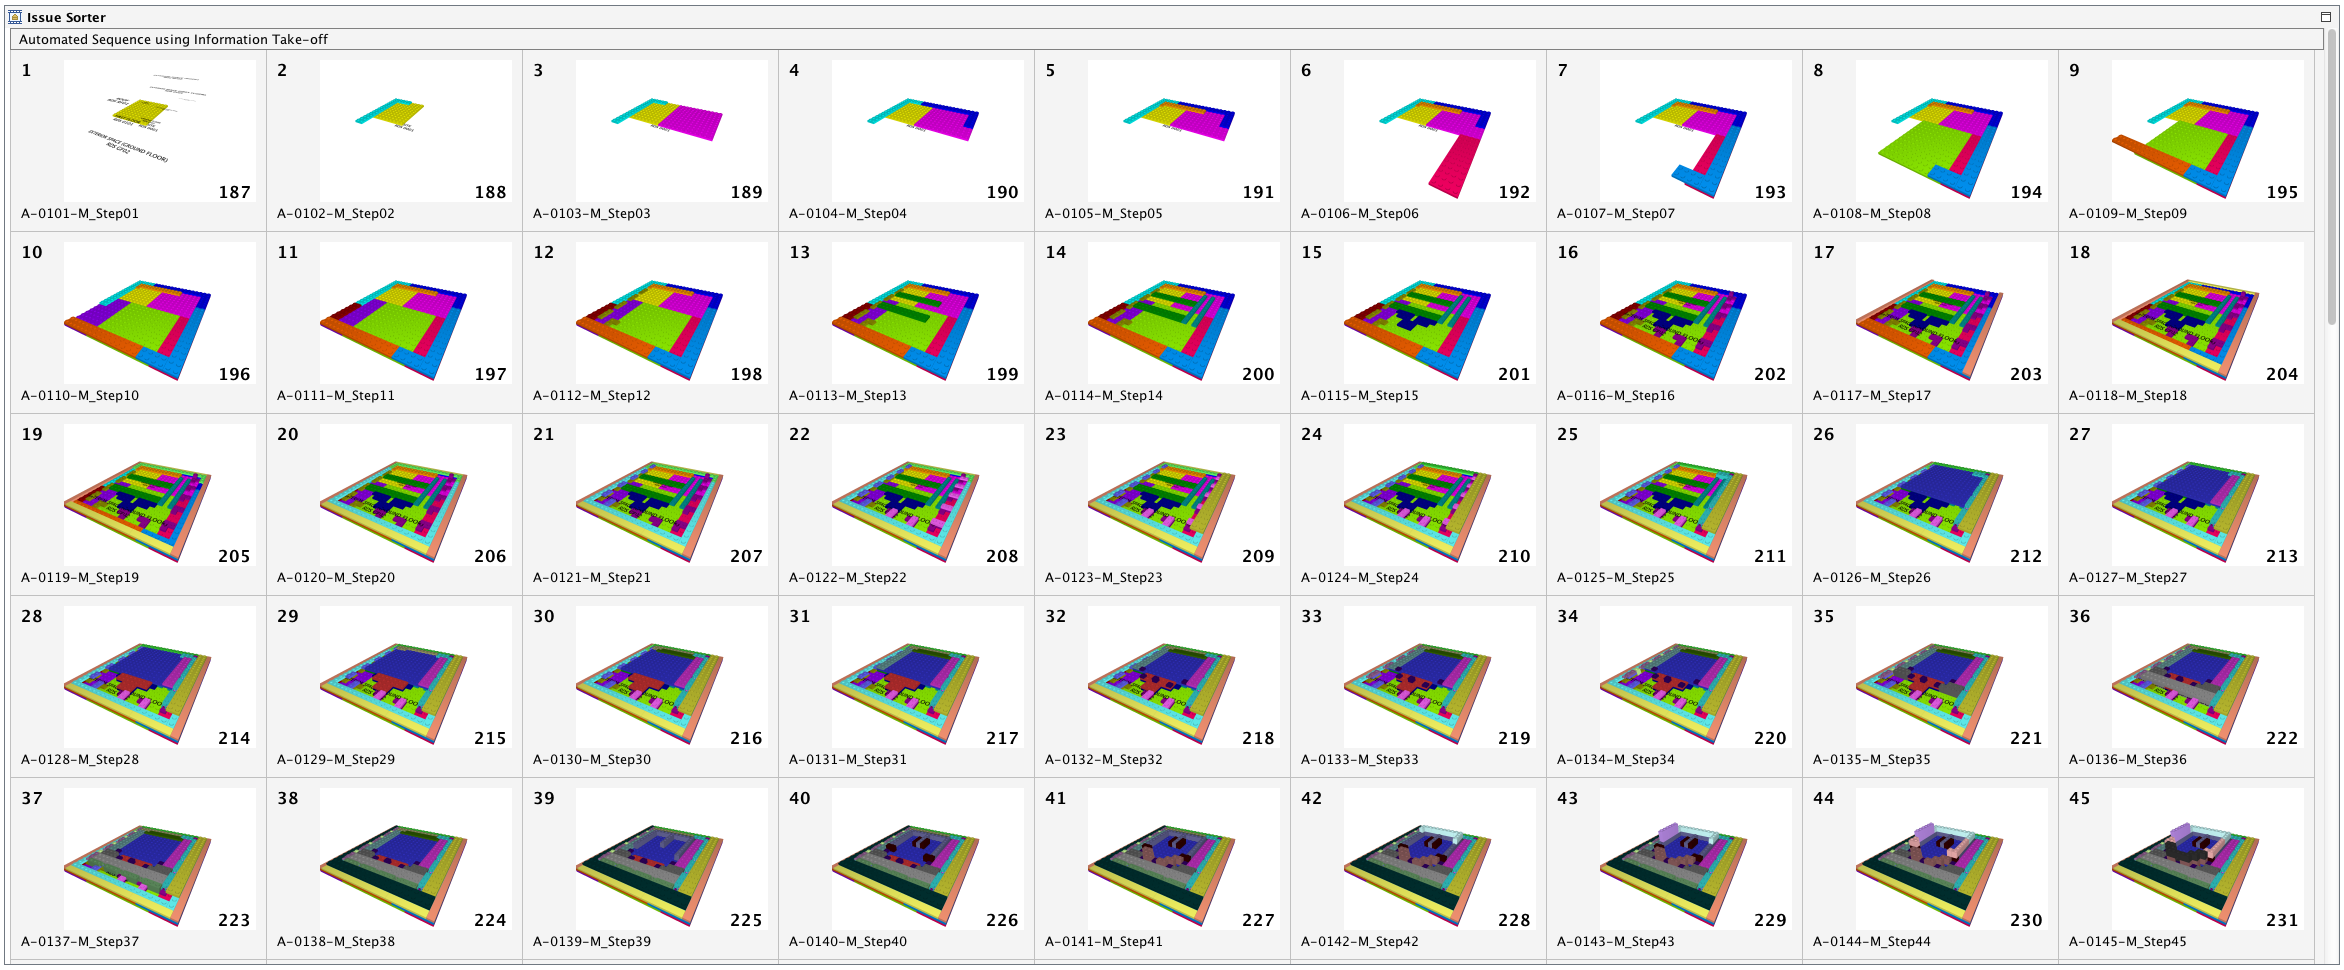
Below we can see the full 137 steps of the LEGO sequence that are included in our model and have been created automatically by Solibri Model Checker.
Image: Slides 1 to 45 (click to enlarge)
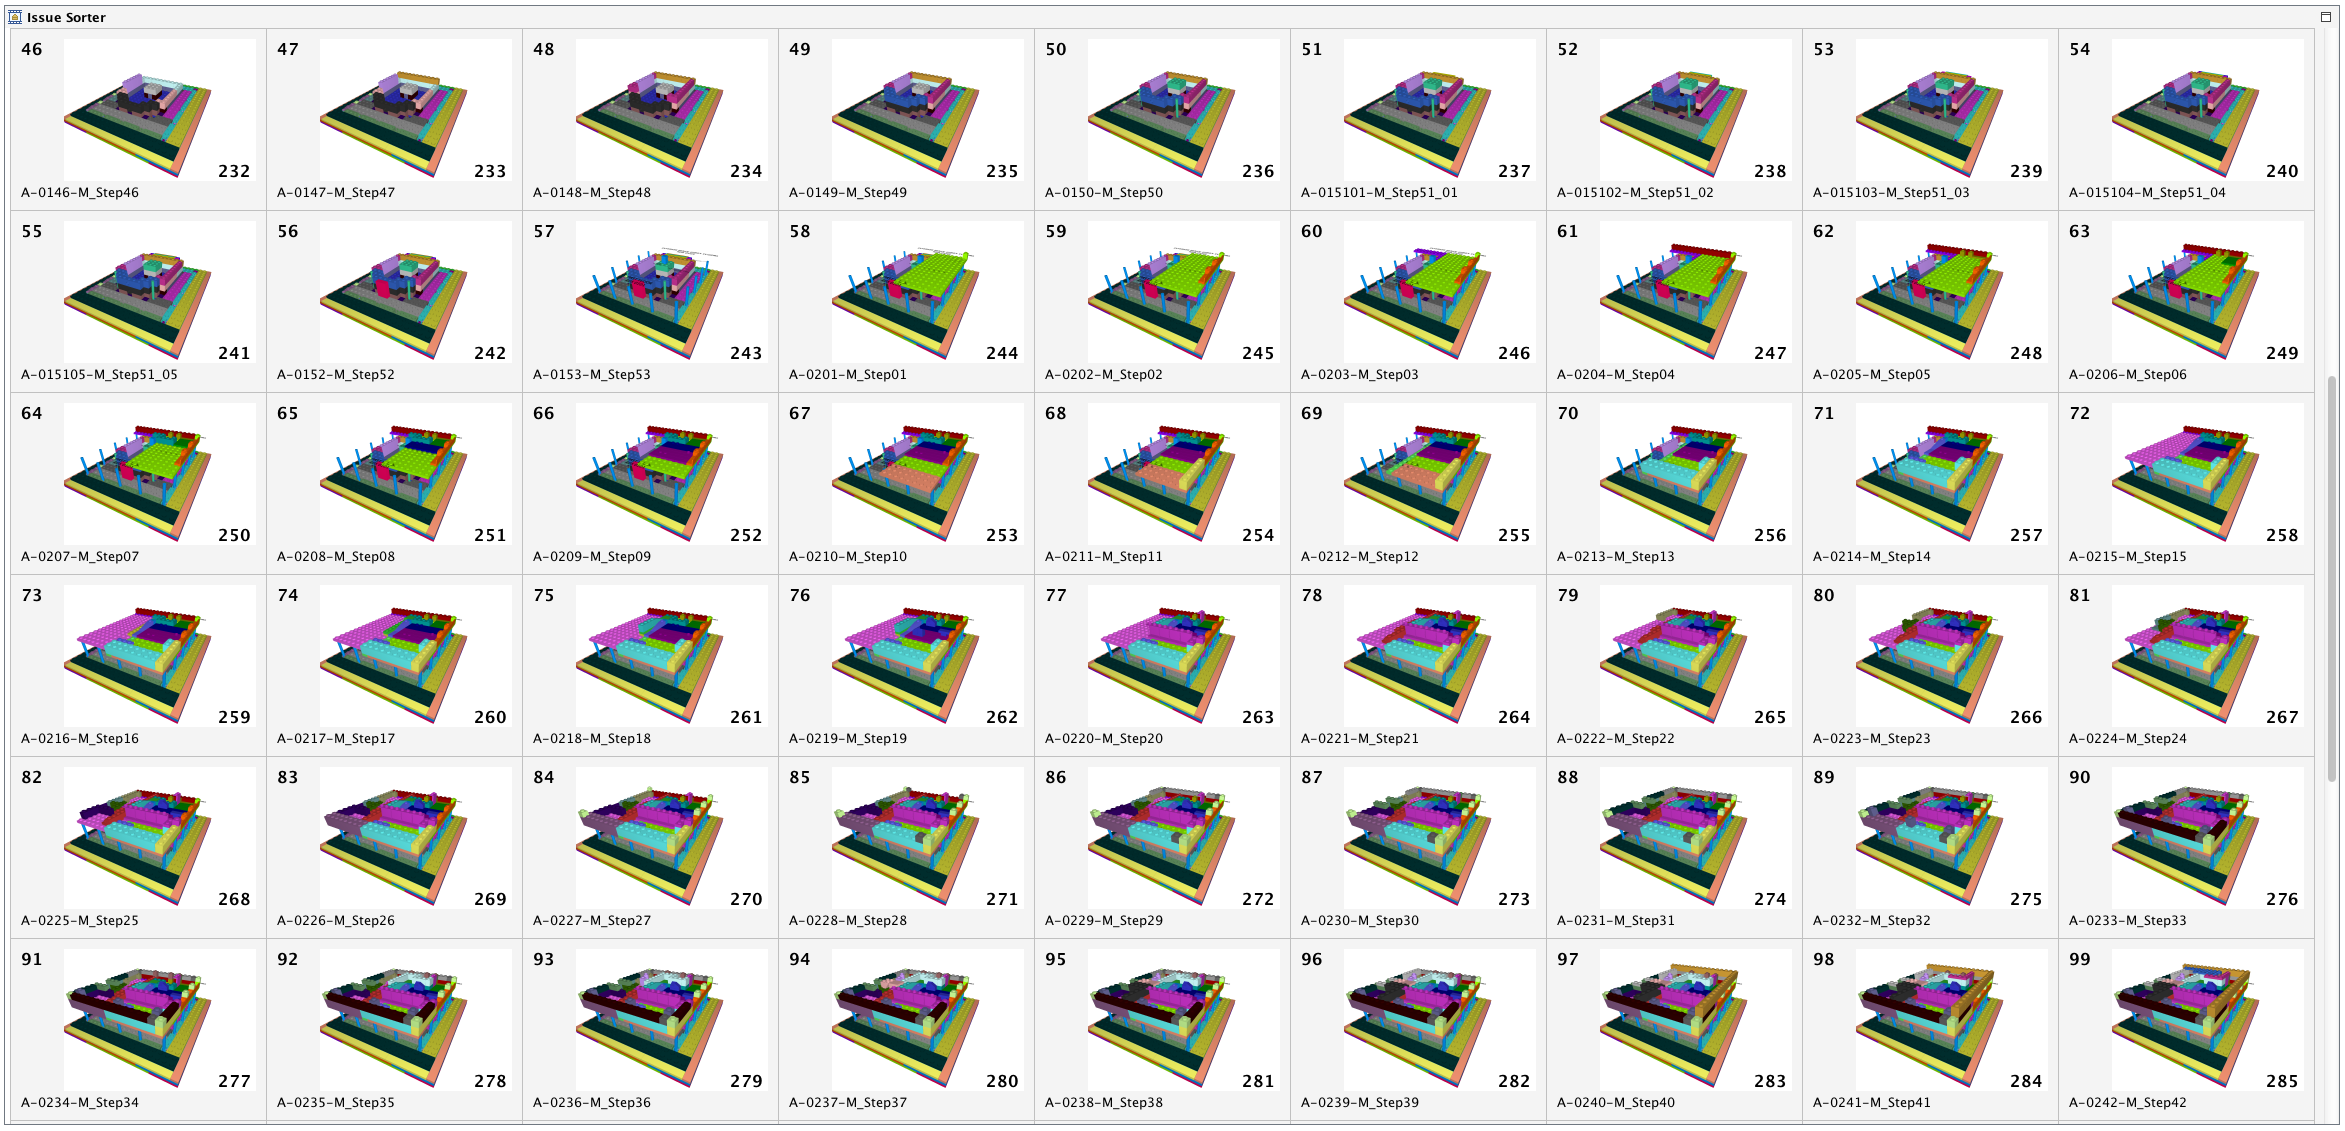
Image: Slides 46 to 99 (click to enlarge)
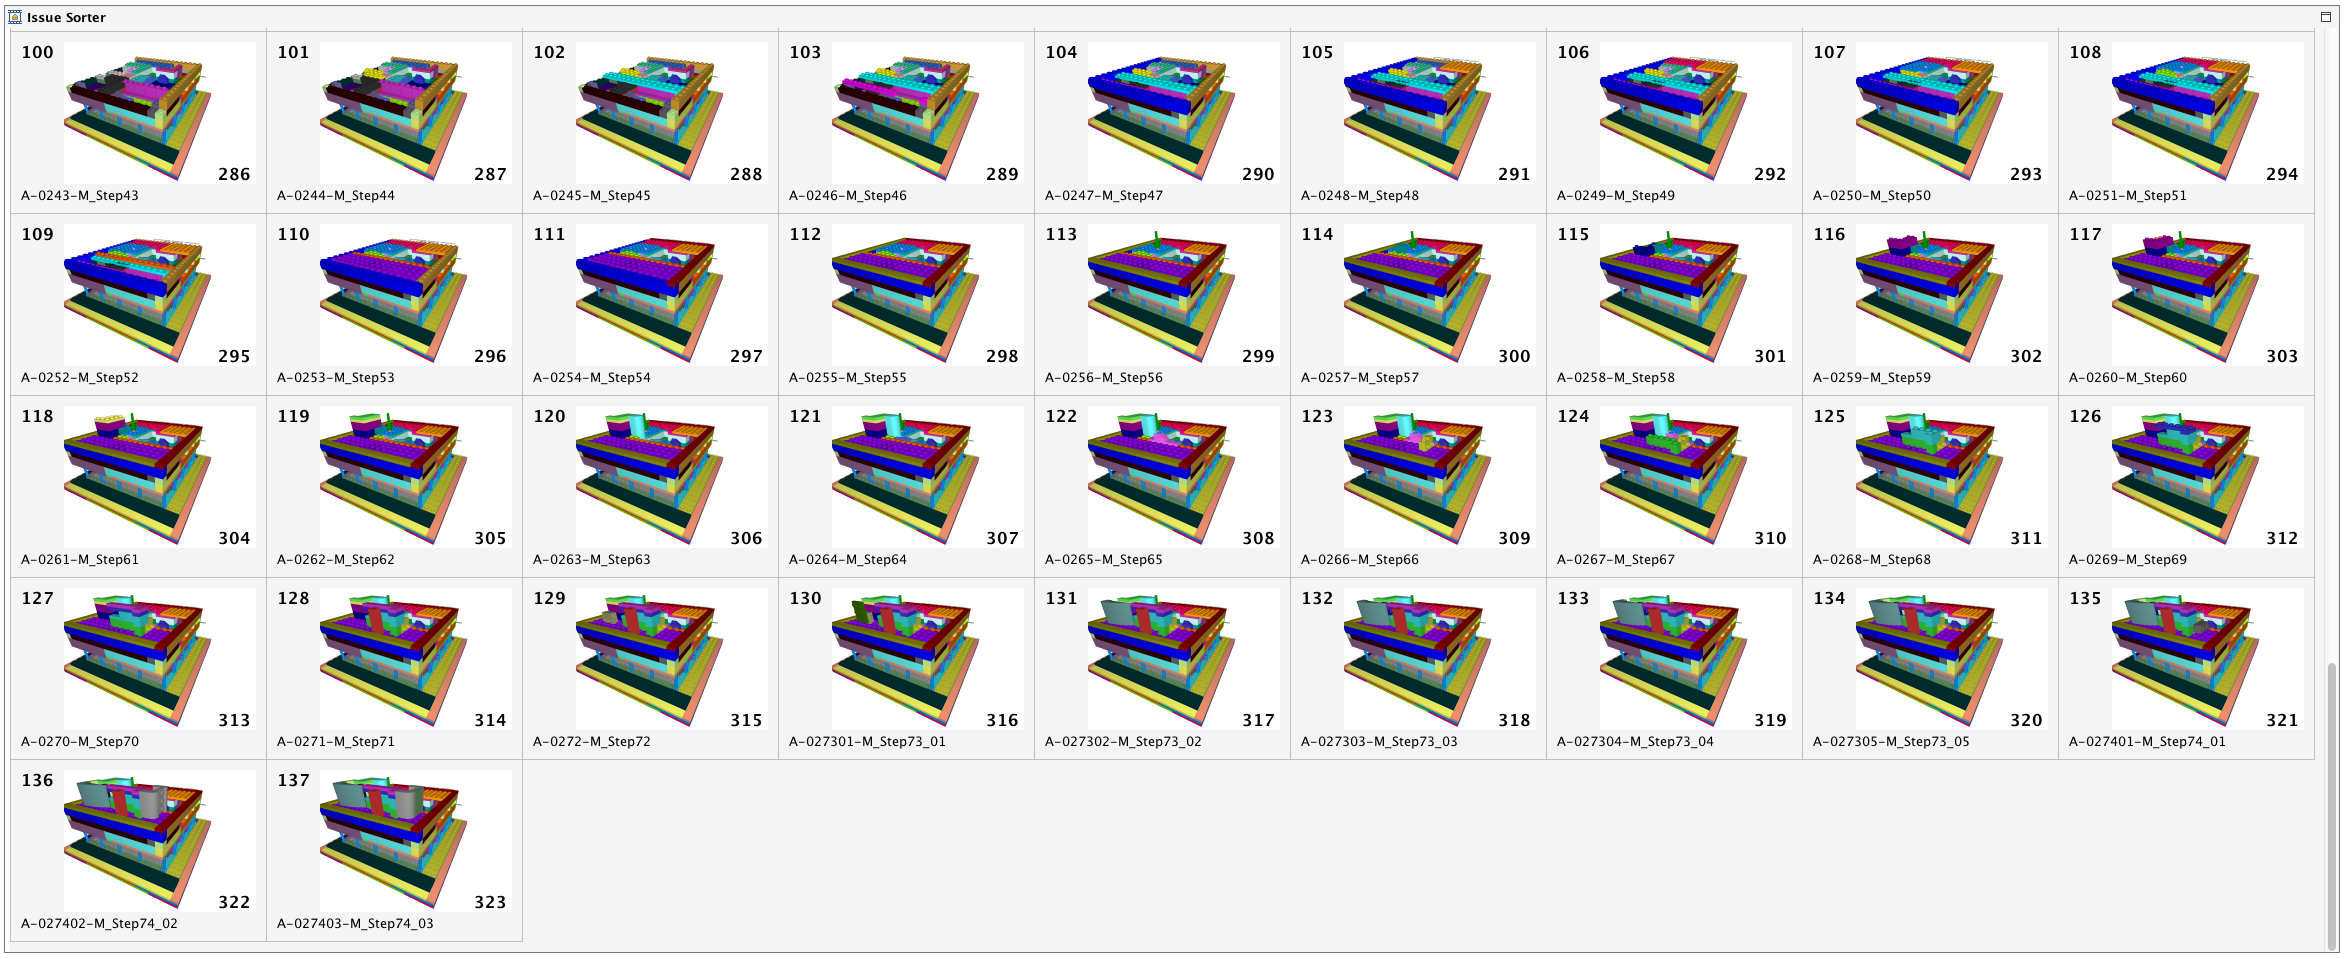
Image: Slides 100 to 137 (click to enlarge)
The slides can be played one at a time like a PowerPoint presentation or run as an animation. The slides would on real projects allow stakeholders to understand and discuss specific points in the sequence.
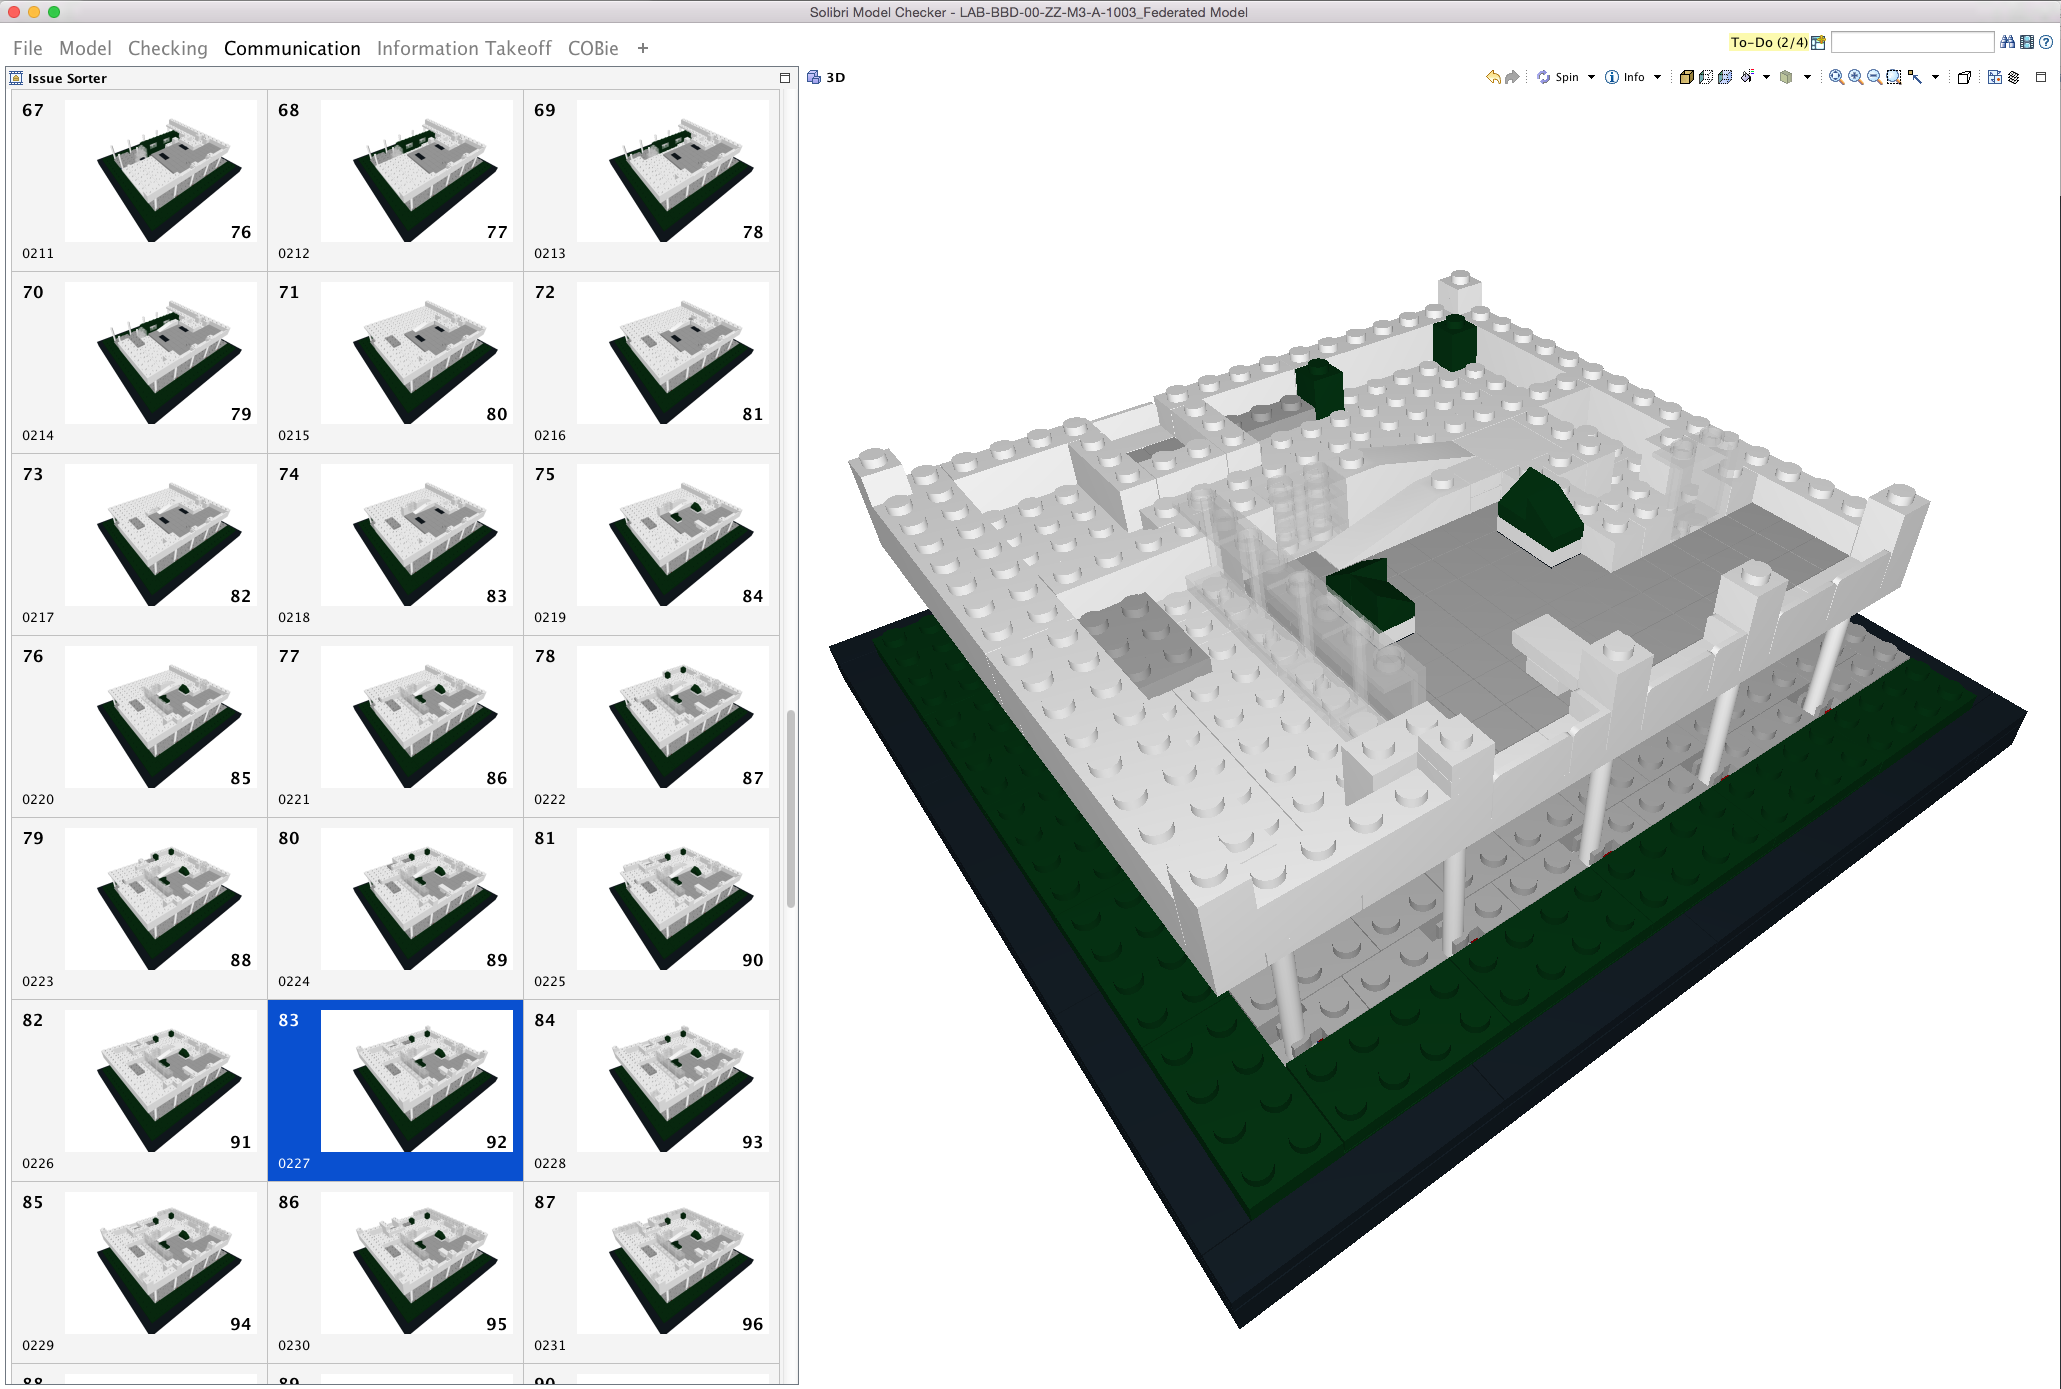
Image: Slides being clicked through in a similar manner to PowerPoint (click to enlarge)
Sequencing Movie
Once all the Slides have been created in the Presentation it is then a simple case of hitting the Play Automatically button to animate the sequence. The speed of the animation can then be adjusted by Right Clicking on the Play Automatically button.
The Issue Sorter does not have to be visible when running the animation but the Presentation does need to be launched.

Image: The first step of the sequence shown in the Issue Sorter and 3D window (click to enlarge)
Here are two videos created using the Presentation mode in Solibri. One is shown with each step in colour as above and the other with the original colours of the LEGO pieces. These were recorded using Camtasia.
Animation 1 – Sequence with each sequence step individually coloured
Animation 2 – Sequence with each sequence step as original colours
Conclusion
One of the reasons I set off on the journey to create the LEGO model and the accompanying blog series was to see what new methods we could learn that may be able to be used for some of our projects. This post is one of those new discoveries that I learnt along this journey.
The process described above is slightly more intelligent than the one we previously discussed in GRAPHISOFT ARCHICAD but it still relies on data from the authoring tool. There are some ways to do this directly in Solibri Model Checker (i.e. using Classification) but it would take a bit of configuring.
In the next post we will look at a more intelligent way of creating a building sequence.
Rob Jackson, Associate Director, Bond Bryan Digital
![]()
Terms and conditions
All content provided on this BIM Blog is for informational purposes only. The owner of this blog makes no representations as to the accuracy or completeness of any information on this site or found by following any link on this site. Bond Bryan will not be liable for any errors or omissions in this information nor for the availability of this information. Bond Bryan will not be liable for any losses, injuries, or damages from the display or use of this information.
We are happy for others to share our blog pieces through all social media platforms. You may include links to the original blog pieces and use part of the blog to then provide a link to the original content. However we would appreciate it if the content is not reproduced in full on other sites or publications without written consent being granted by Bond Bryan.
This policy is subject to change at any time.
LEGO and the Lego logo are trademarks of the LEGO Group. Any trademarks, service marks, product names, corporate names or named features are assumed to be the property of their respective owners, and are used only for reference, without intent to infringe.